Compare two GDS files
A .gds comes back to you. Maybe a colleague "just fixed the pad pitch", maybe the foundry returned a corrected version, maybe you found an older backup and cannot remember which one you taped out. The file opens fine and looks right — which tells you nothing, because a 2 µm shift on one pad looks exactly like no shift at all when you are zoomed out to the whole die.
Glyph answers this with an XOR diff: it flattens both files' full hierarchy, subtracts one from the other layer by layer, and turns every leftover patch of geometry into a marker you can step through.
This guide is self-contained — there is nothing to download. Steps 1–5 draw a small test chip and save it as chip-rev-a.gds; steps 6–9 make exactly three edits and save that as chip-rev-b.gds; steps 10–22 diff them, walk the differences and dismiss one you already knew about. Every number quoted below is one you can check by hand, and the arithmetic is spelled out where it is not obvious.
- Time: ~25 min
- You'll need: just the editor, on a blank document. If you already have two revisions of your own design, open the older one and skip to step 11 — the numbers will be yours, the mechanics identical.
One orientation note before you start: the tabbed panel with Layers / Cells / Objects / Results sits on the right-hand side of the window, underneath Properties. You can drag its inner edge to make it wider if you want more room — the screenshots below use the default width.
Draw the first pad. In the toolbar's DRAW group click Box (or press B) and drag a rough square near the origin — do not aim, you cannot drag to the nanometre. The new box stays selected, so type the exact numbers into Properties on the right instead: W
20, H20, X0, Y0, pressing Enter (or Tab) after each. The panel is authoritative — what you type wins over what you dragged. Leave Anchor on Corner, which makes X and Y the box's lower-left corner. A blank document already carries three layers, and the pad lands on the active one,Layer 1(1/0).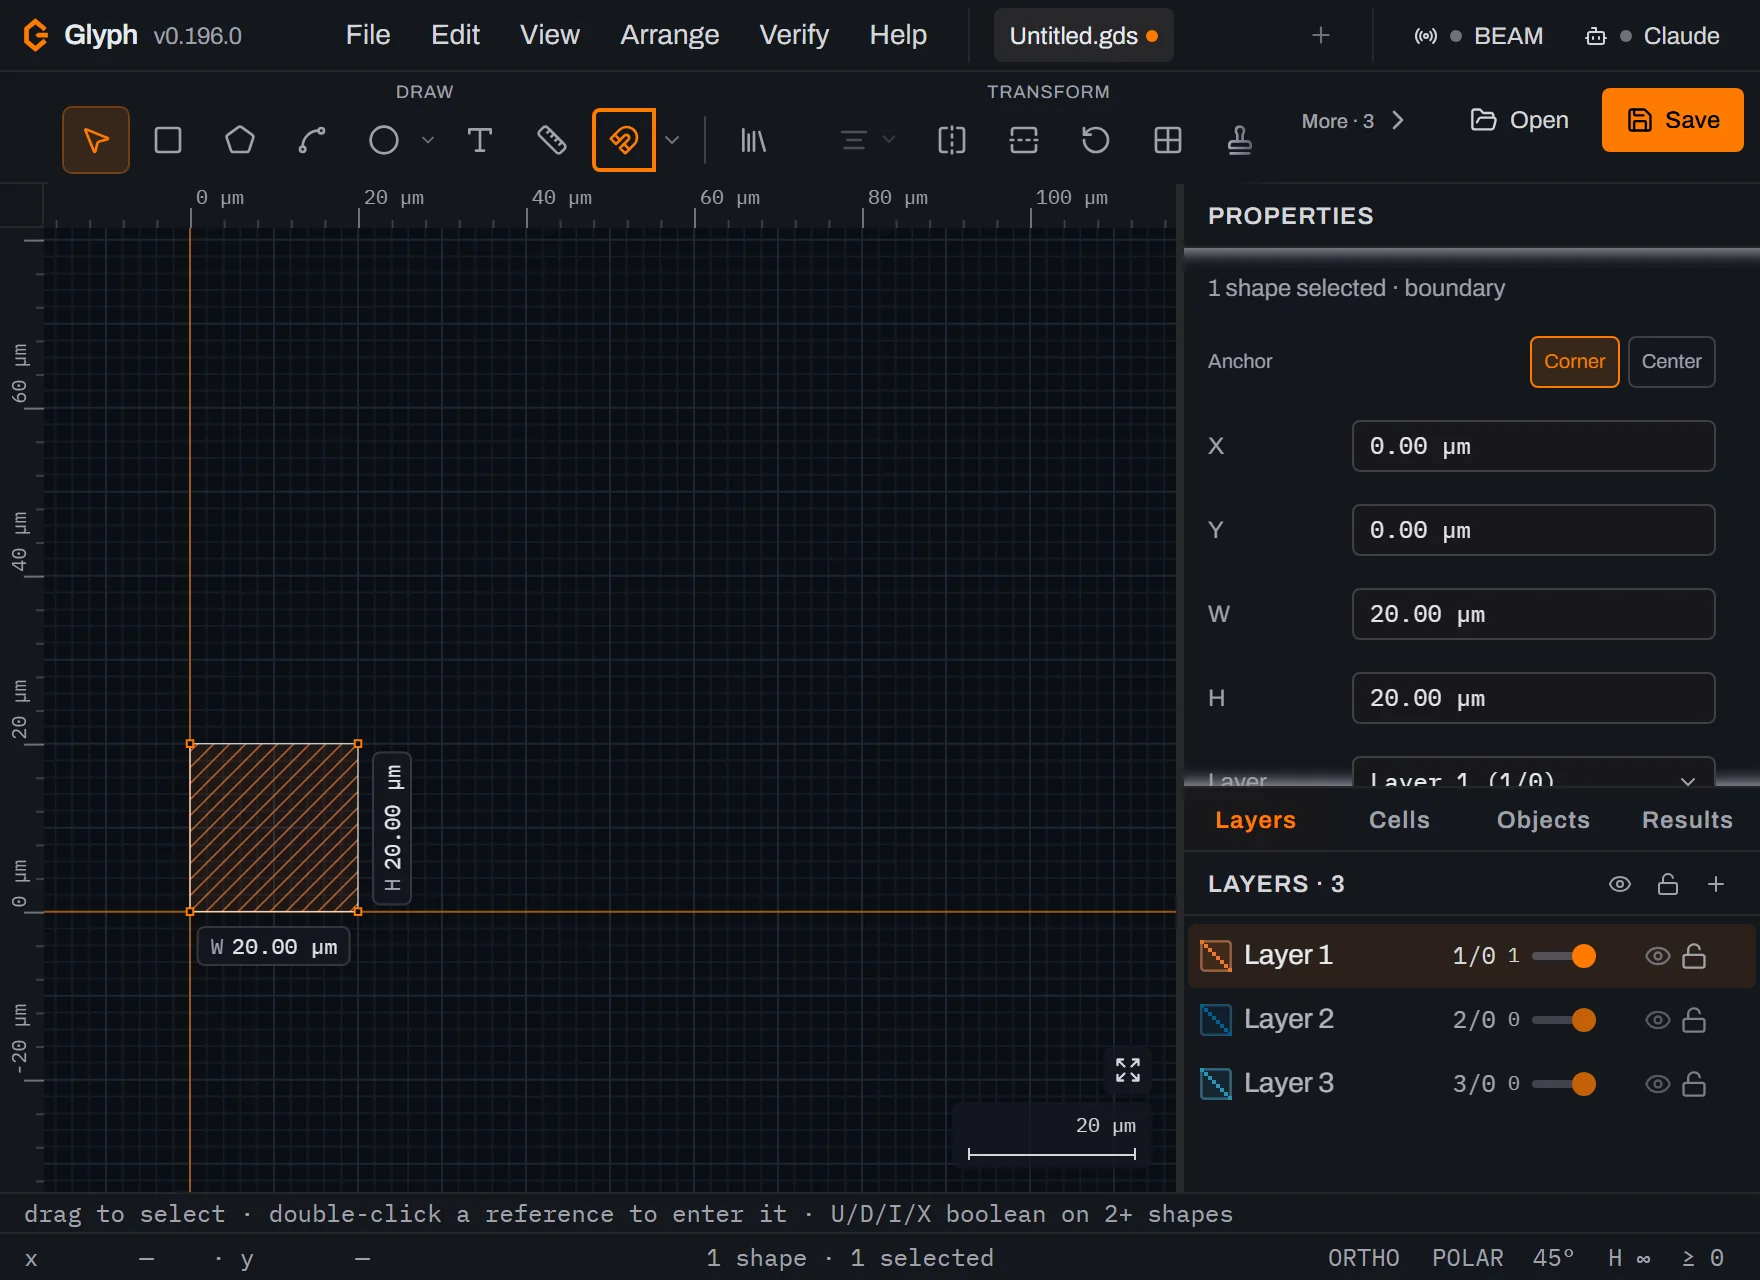 View full image
Two more pads, at X = 40 µm and X = 80 µm. Same recipe twice: click Box again, drag roughly, then type
20/20/40/0and20/20/80/0. Re-arming the tool each time is not optional — Glyph's draw tools are one-shot, so after a box commits the toolbar flips back to Select and a second drag would only marquee-select. The status bar now reads3 shapes · 1 selected, and the three pads sit on a 40 µm pitch with 20 µm gaps.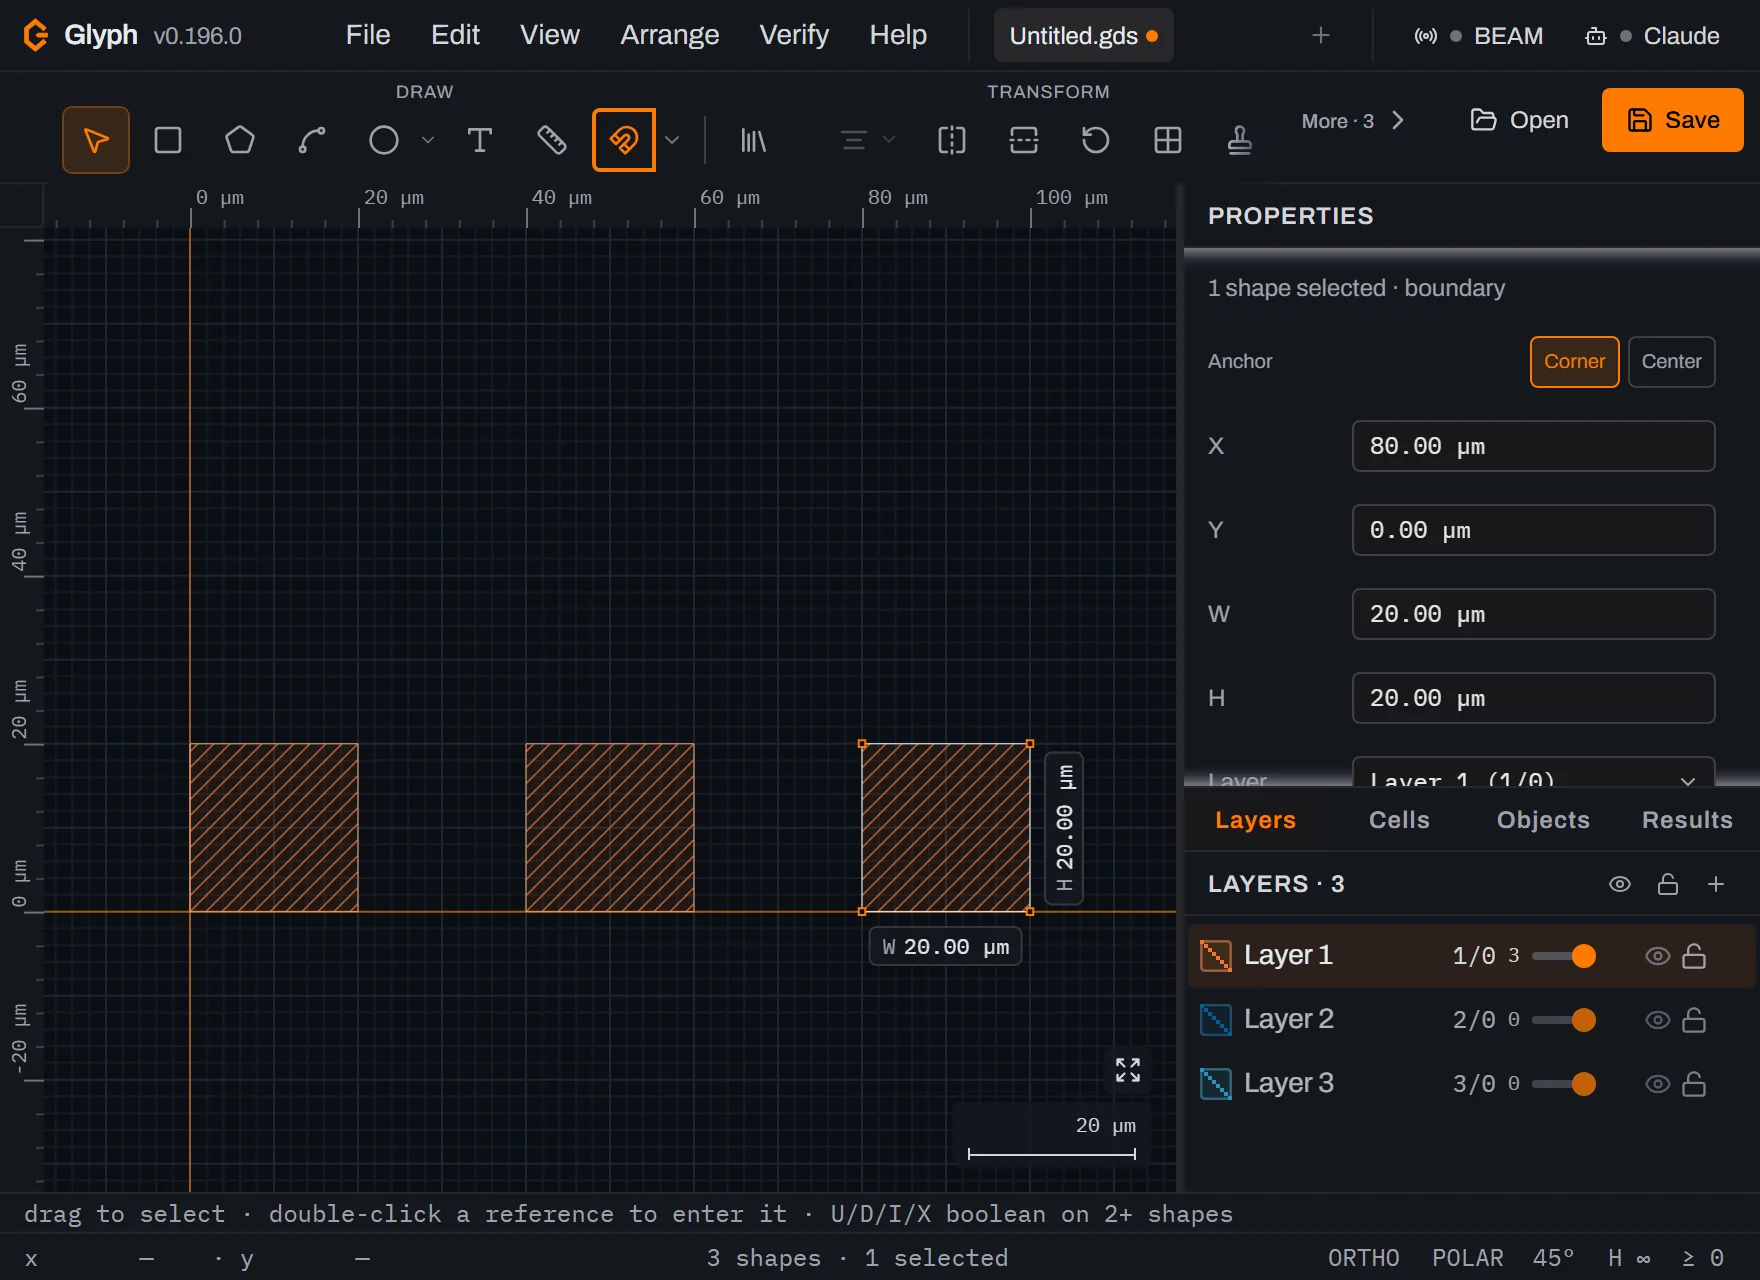 View full image
Put two fiducials on a second layer. Click the
Layer 2row in the Layers panel — that makes2/0the active layer, and the row highlights. Draw two more boxes the same way:10/10/0/40, then10/10/90/40. They come out blue rather than orange because each layer carries its own colour and hatch. The layer rows now count3and2, and the status bar reads5 shapes · 1 selected. That is revision A: three pads on1/0, two alignment fiducials on2/0.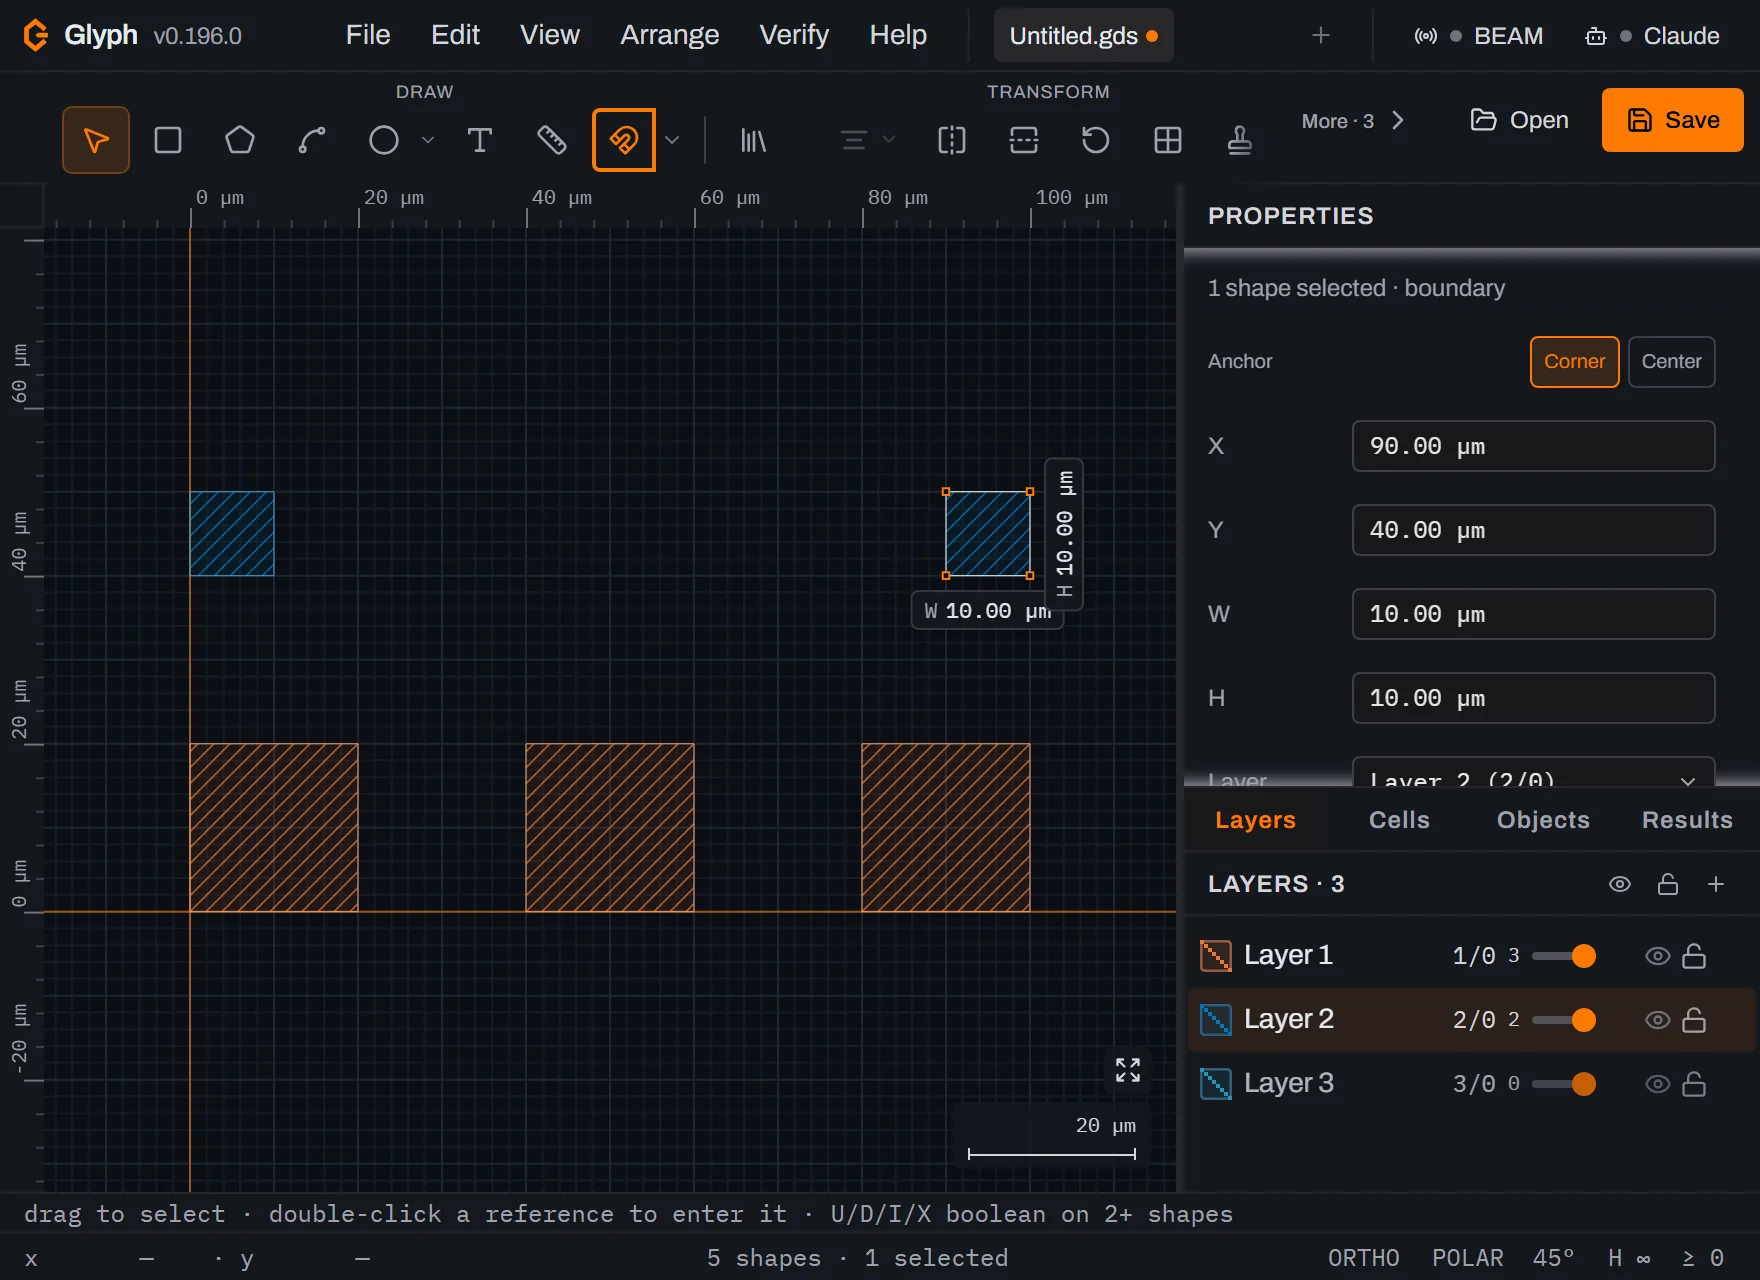 View full image
Name the library. Open and type
chip-rev-ainto LIBRARY NAME (LIBNAME). Its own hint says why this matters here: "Written into the GDS library record on export and used as the default save filename." Naming the document now means the save in the next step already suggests the right filename. Click Apply.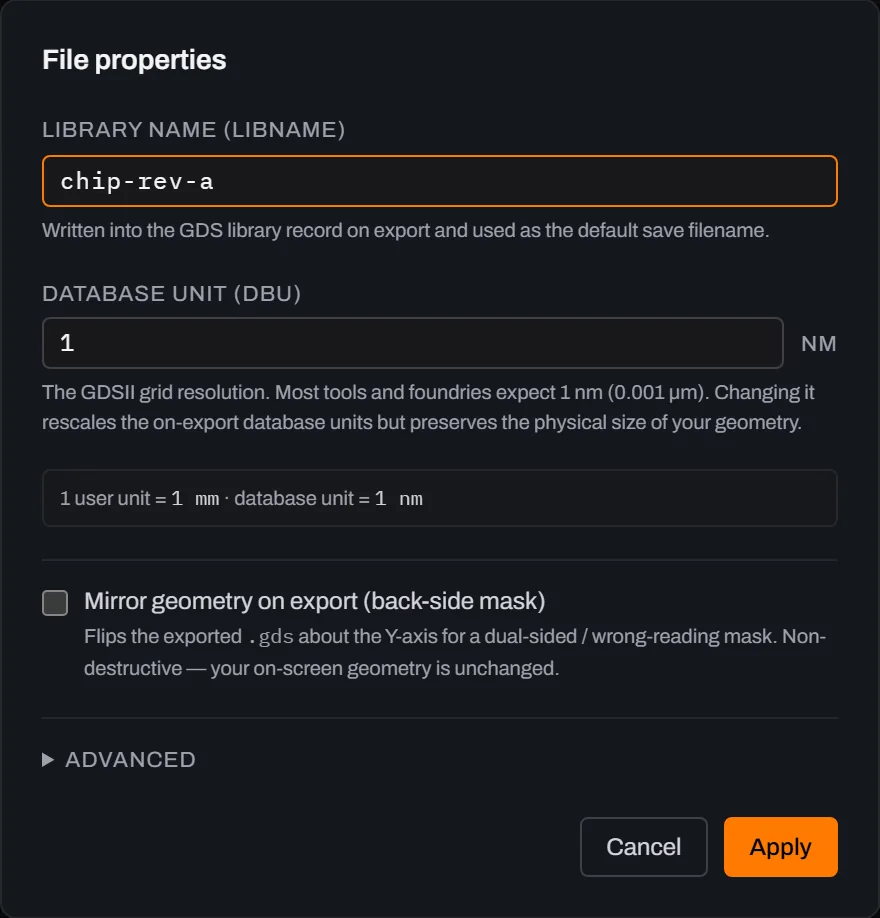 View full image
Save it as
chip-rev-a.gds. (Ctrl+Shift+S). On Chrome and Edge your operating system's save dialog opens withchip-rev-a.gdsalready filled in — pick a folder you can find again; on other browsers the same click downloads that file instead. Either way Glyph confirms with the toastSaved as chip-rev-a.gds to your browser's downloads(Saved as chip-rev-a.gdswhen you picked the folder yourself); its Details button shows the SHA-256 checksum of the exact bytes just written — a quick way to confirm two people have byte-identical copies of a file without diffing it. (The picker belongs to your OS, so the screenshot below is the toast that follows it.)
Edit 1 of 3 — move the middle pad 2 µm to the right. Click that pad on the canvas to select it — click, don't drag: a 2-pixel drag silently moves the pad by an arbitrary amount, and if that happens press
Ctrl+Zbefore continuing, or every number below diverges. Then type42into X and press Enter. That is the change this whole guide is really about: 2 µm on a 100 µm chip is invisible at any zoom that shows the whole design, and it is exactly what a diff finds in seconds.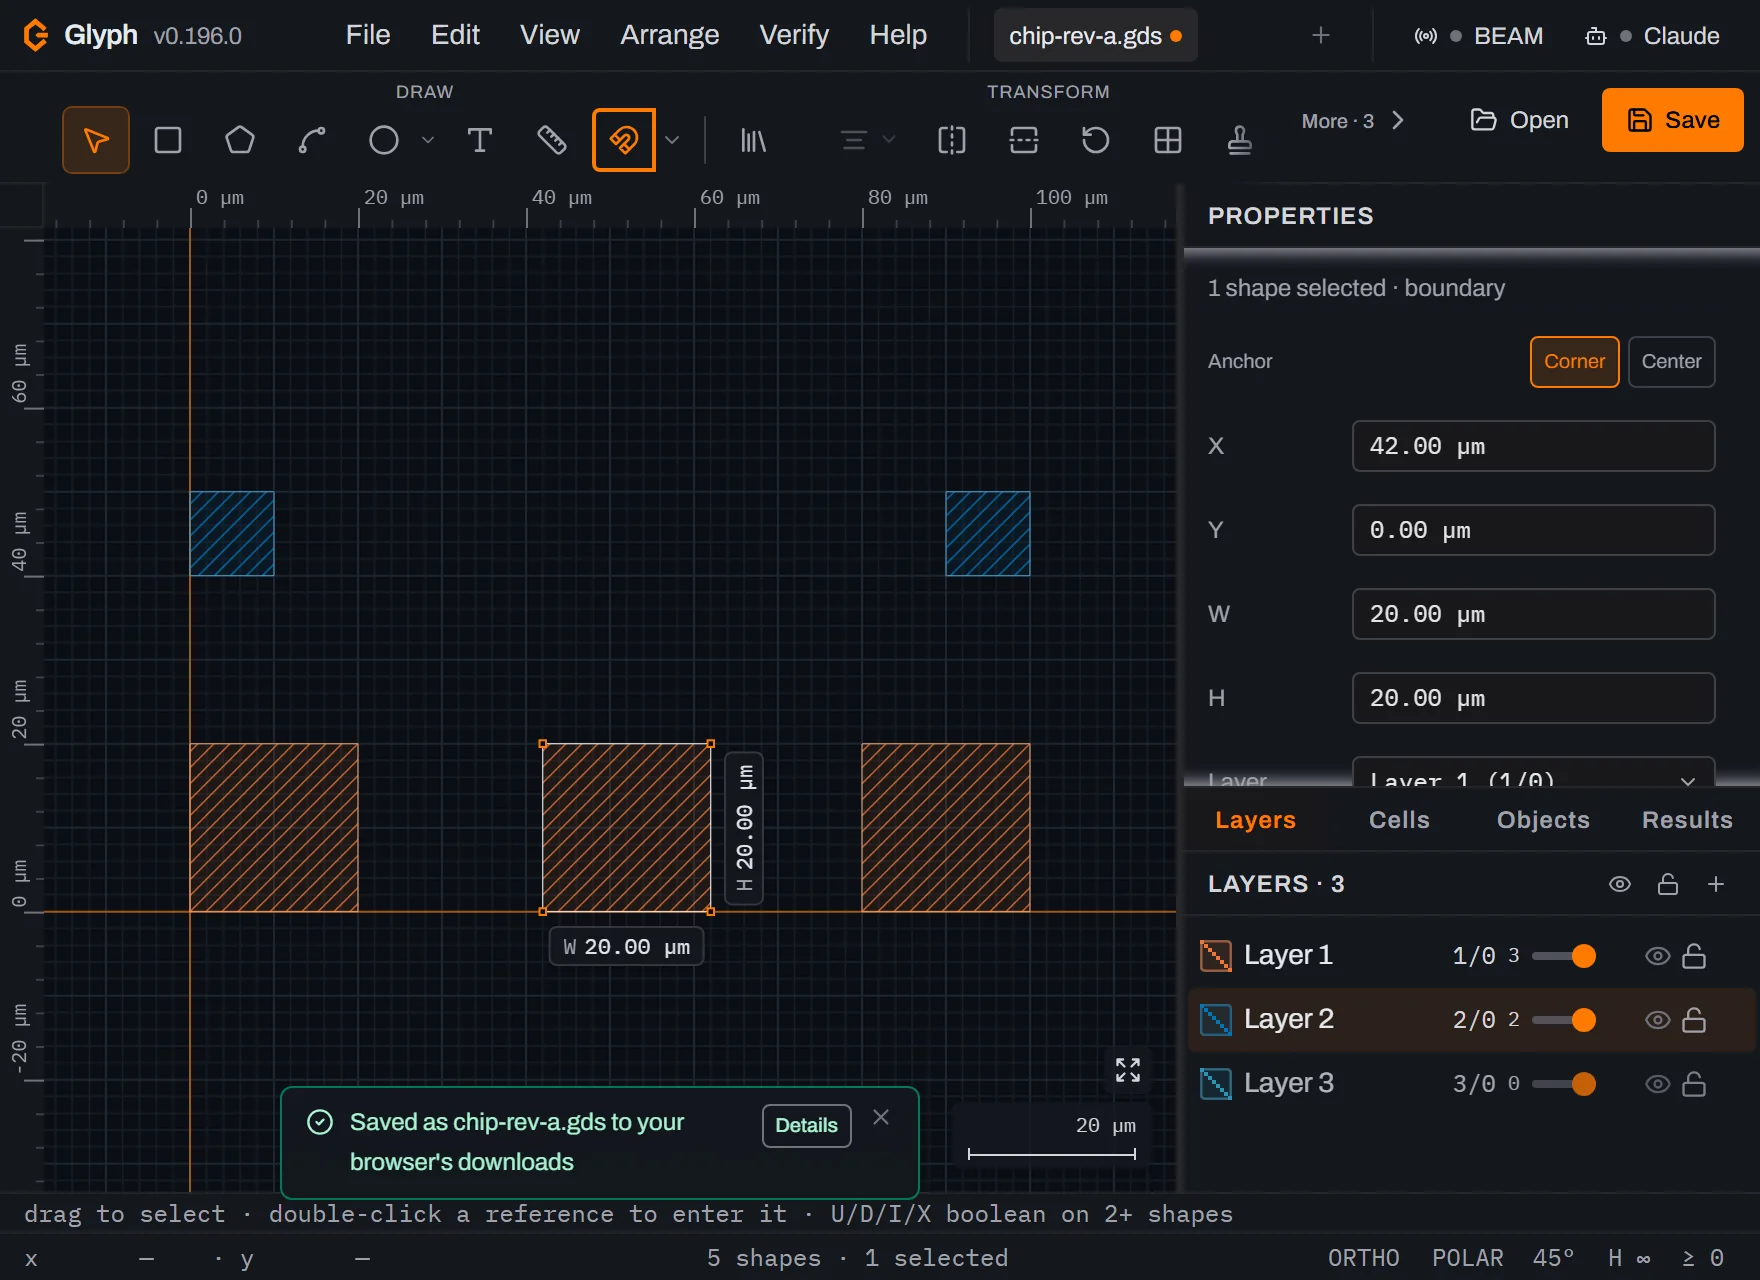 View full image
Edit 2 of 3 — delete the right-hand pad. Click the pad at X = 80 µm and press Delete ( does the same thing). The status bar drops to
4 shapes.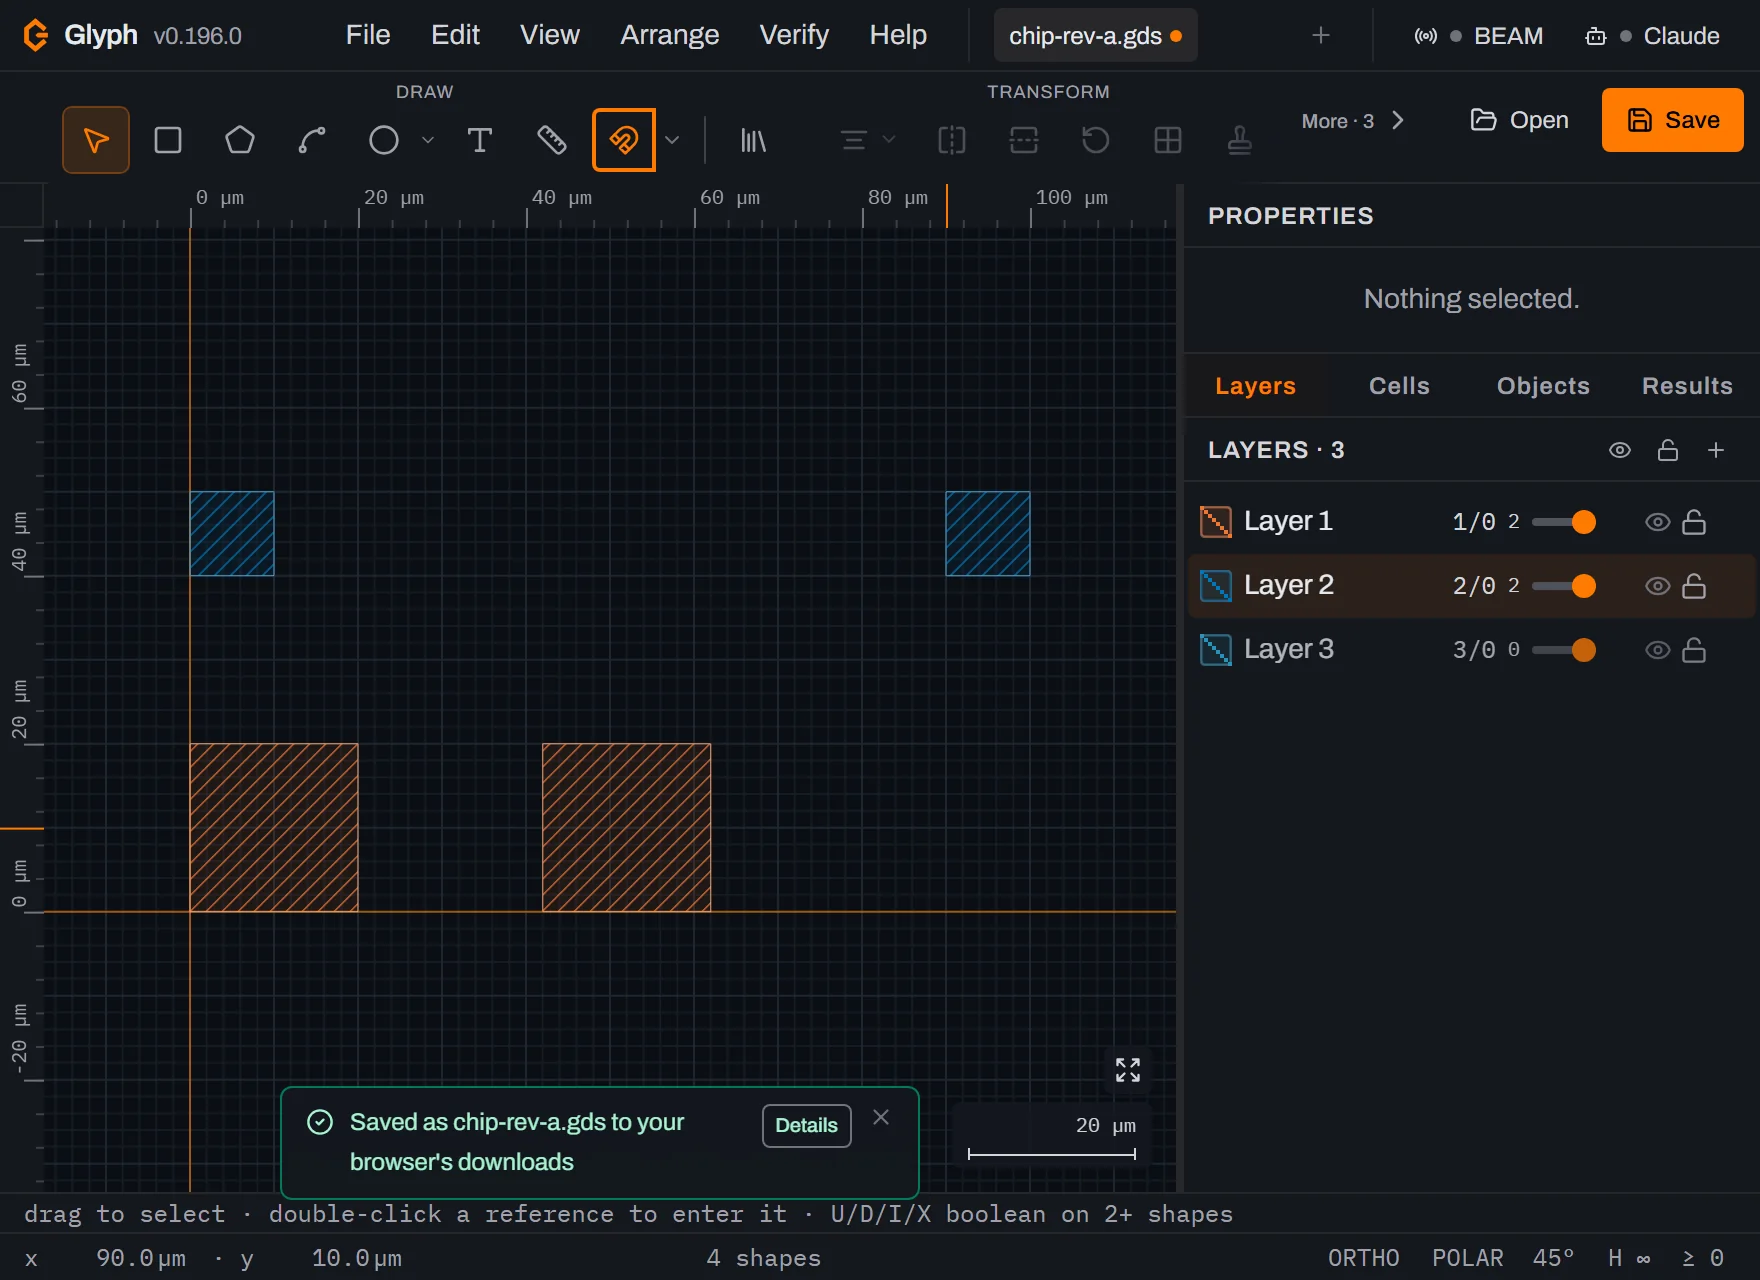 View full image
Edit 3 of 3 — grow the right fiducial from 10 µm to 14 µm. Click it, type
14into W, then14into H. Watch X and Y: they change from90/40to88.00 µm/38.00 µm, because W and H scale a shape about its centre. The fiducial therefore grew by 2 µm on all four sides — it is concentric with the old one, which is what makes its difference region a ring in step 13.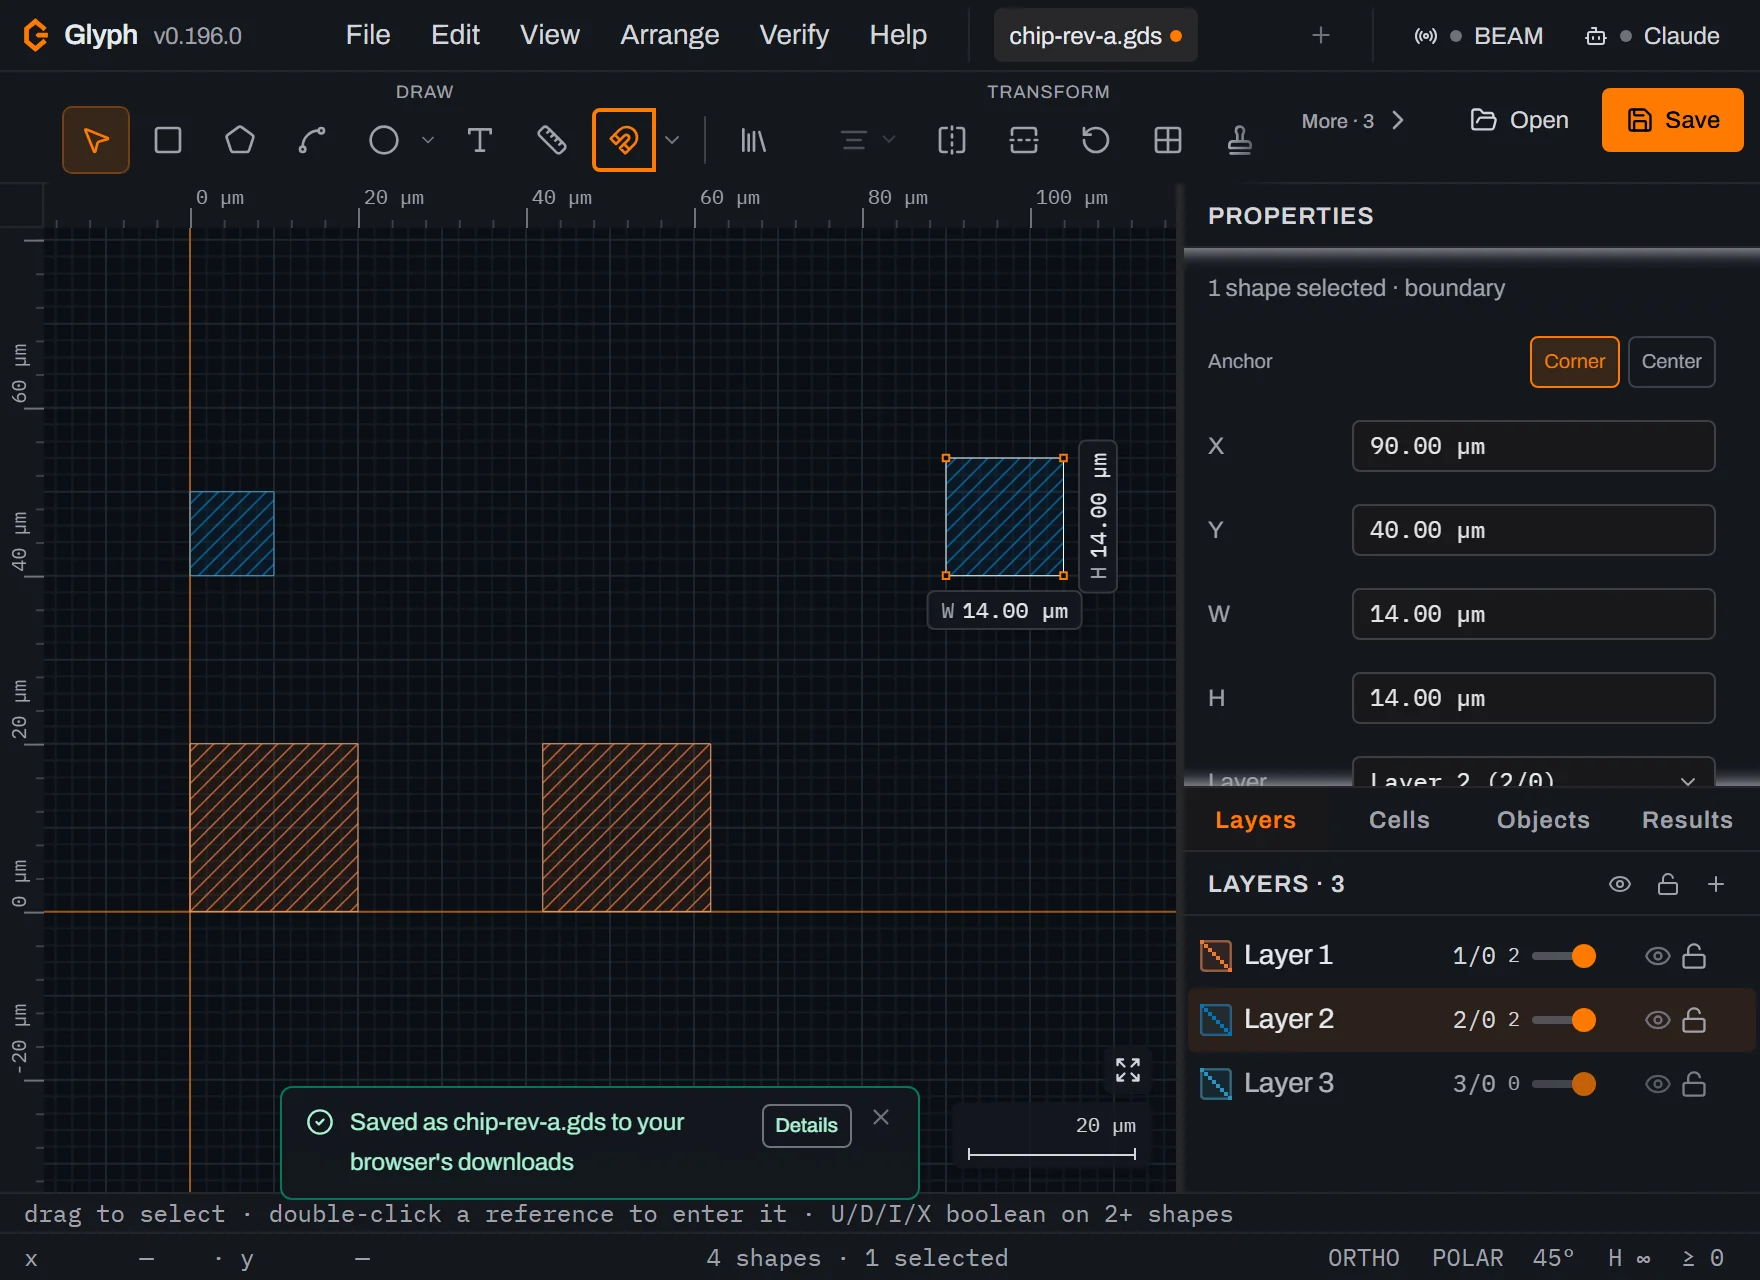 View full image
Save the result as
chip-rev-b.gds. Open again, change the library name tochip-rev-b, Apply, then . The toast readsSaved as chip-rev-b.gds, with the same Details button. You now have two files on disk that differ by exactly three known edits — which is the only honest way to learn a diff tool: you can check its answer.
Reopen revision A. Click Open at the top right (or press Ctrl+O) and choose
chip-rev-a.gds. This step is not busywork: the diff always runs against whatever document is in front of you, so the older revision has to be the one open. The tab readschip-rev-a.gds, the status bar5 shapes, and the Layers panel lists only the two layer/datatype pairs the file actually uses —1/0with 3 shapes and2/0with 2. (If aSaved as chip-rev-b.gdstoast is still fading out in the corner from the step before, ignore it — it's stale, not a sign you opened the wrong file.)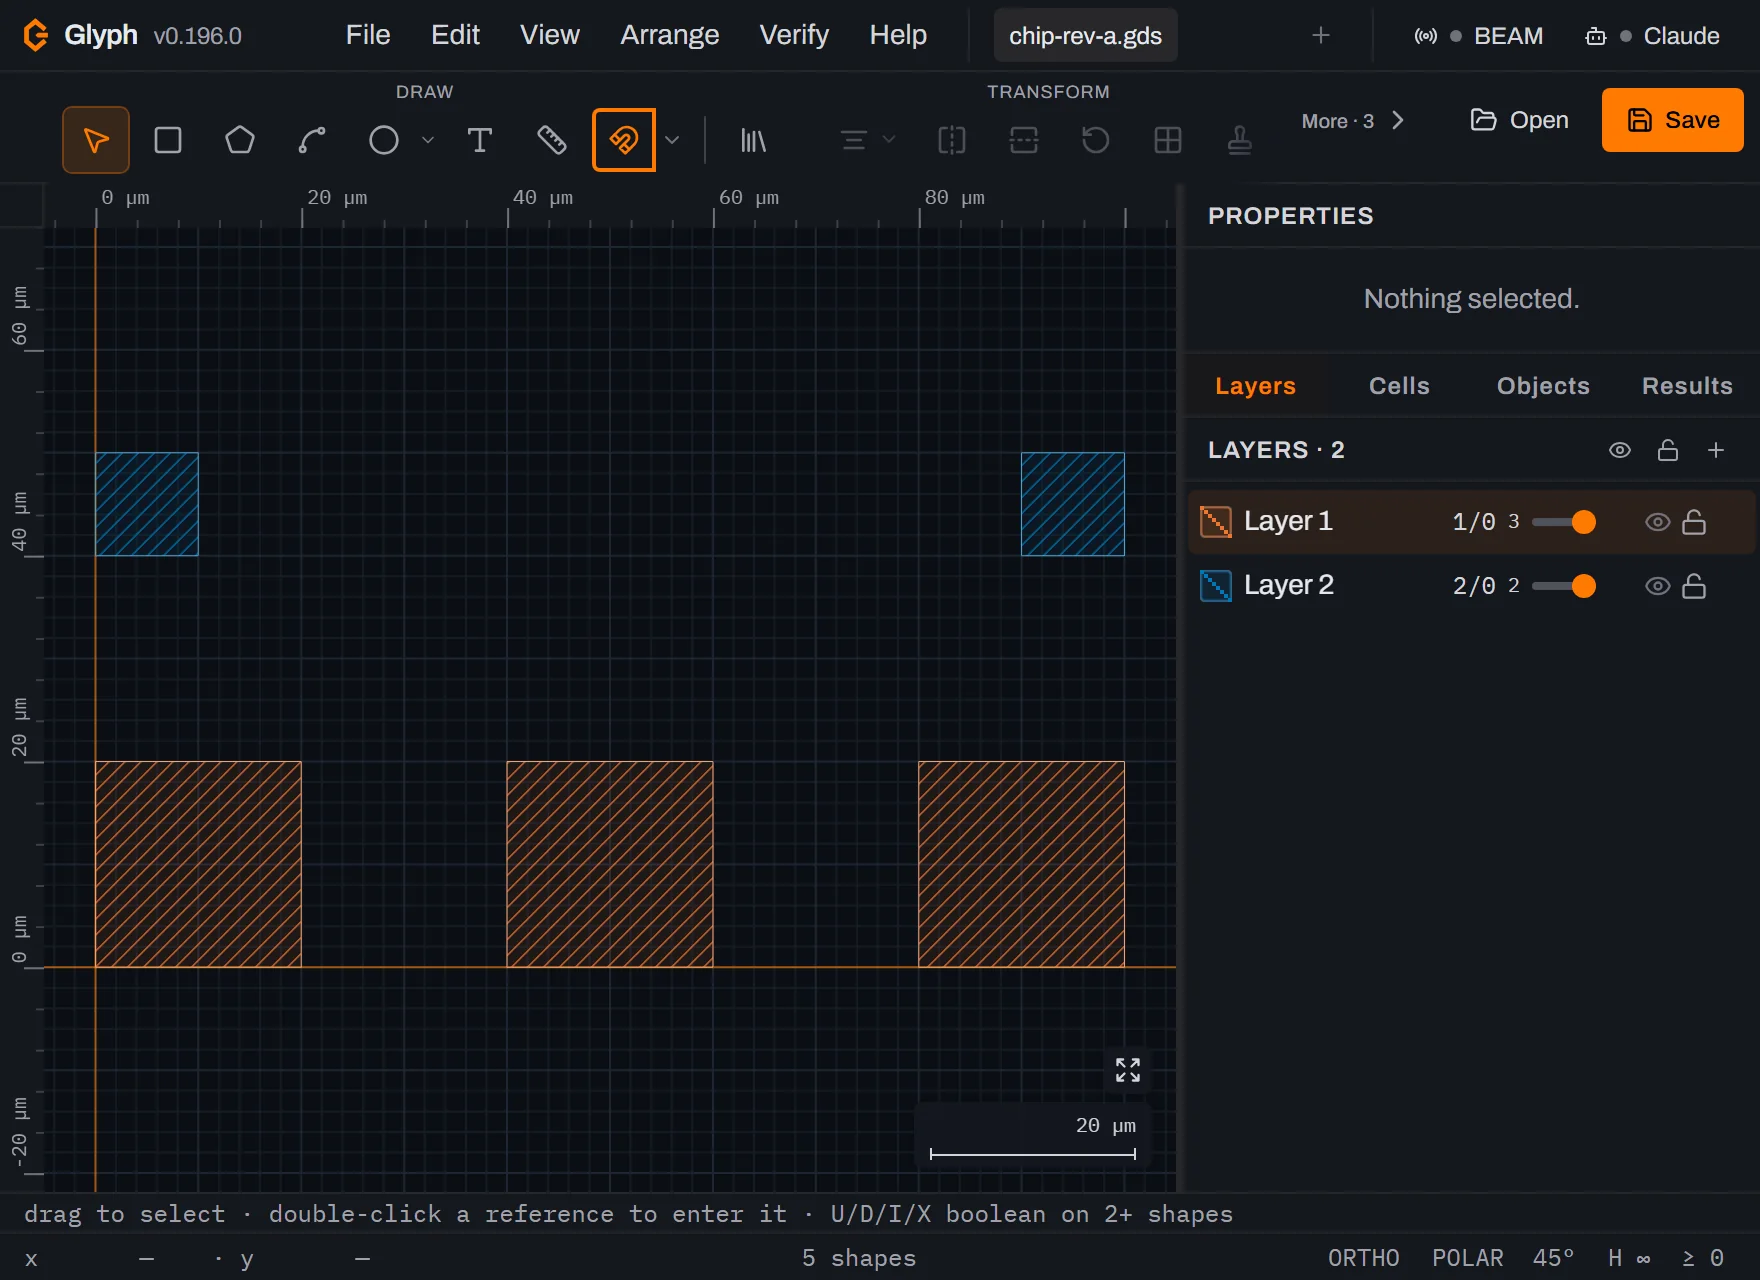 View full image
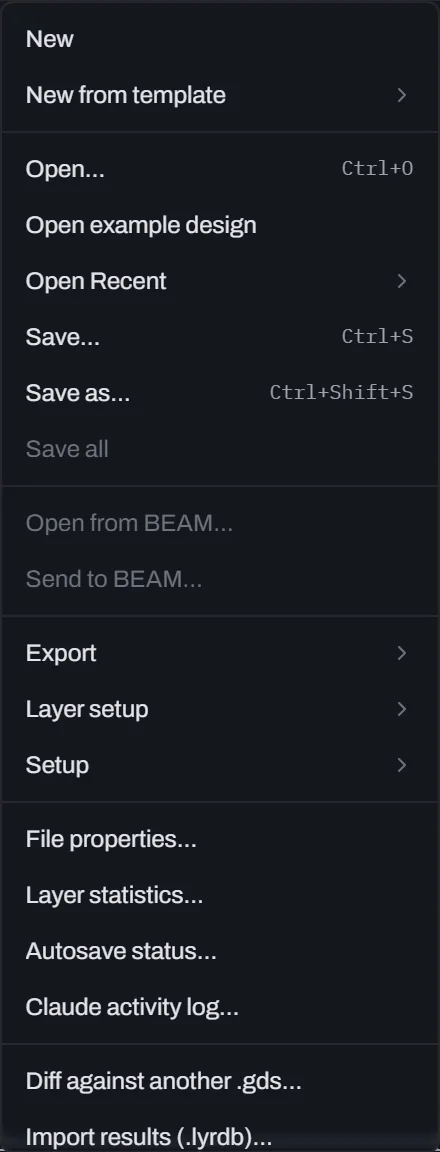
Find the diff command. Open the File menu. Its last group holds two entries — Diff against another .gds… and Import results (.lyrdb)… — below Claude activity log…. (At this window height the whole File menu fits without scrolling.) It is a File command rather than a Verify one because it compares two files: nothing about your document changes, and nothing is added to the undo stack. Choosing it first opens a small tolerance bands dialog before the file picker — see "Grading small differences as noise" near the end of this guide — and clicking Choose file… with its default value continues exactly as this walkthrough describes.
Choose the other revision. Click it and pick
chip-rev-b.gds— again through your operating system's file picker, so the screenshot is the state right after the pick. Glyph flattens the whole SREF/AREF hierarchy of both files, XORs them layer by layer, and shows the report. At the same time it publishes the differences as markers: one toast sums it up —2 layers differ — +N/−M elements in 4 regions, showing 1 of 4; press F2 for the next., with your element counts in place of N and M — and the canvas re-frames on the biggest one. On a design this small that means it zooms out — Glyph gives a region at least ten times its narrow dimension of context on each side, so a 20 µm region is framed in a 400 µm box and the ruler now spans about 570 µm where the whole design had fitted in about 135 µm.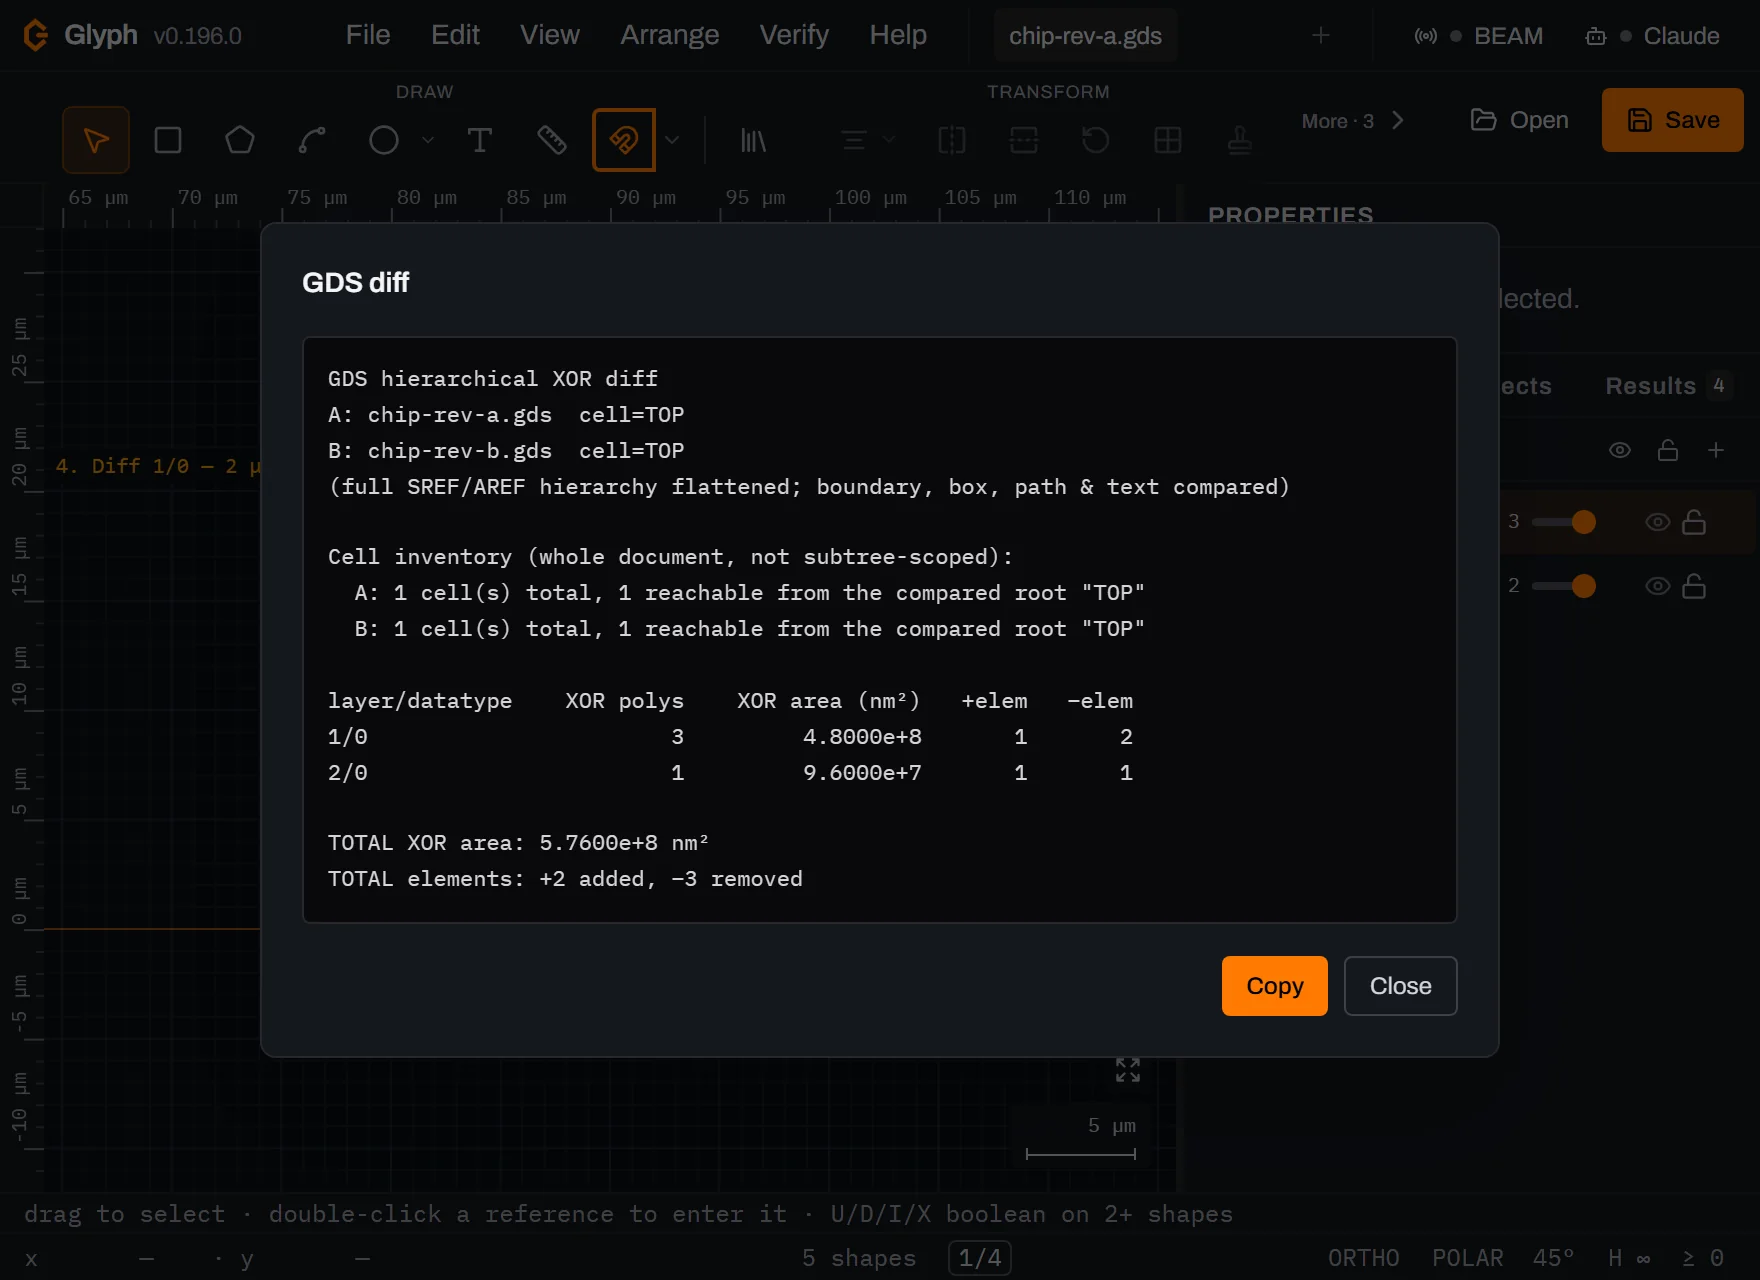 View full image
Read the report — and check its arithmetic. Two lines of provenance (
A:andB:, each with the cell that was compared), then one row per layer/datatype pair that differs. Every number here is one of your three edits:1/0— 3 XOR polygons,4.8000e+8nm². The deleted pad is one 20 × 20 µm region = 400 µm². The 2 µm shift leaves two slivers, 2 × 20 µm each: one where the pad left, one where it arrived = 40 + 40 µm². Total 480 µm², and 1 µm² = 10⁶ nm², so 480 µm² = 4.8 × 10⁸ nm². ✓2/0— 1 XOR polygon,9.6000e+7nm². The fiducial grew concentrically, so its difference is a square ring: 14 µm outside, 10 µm inside — one polygon with a hole, which is why the count is 1. Glyph reports the ring's net area, outer minus hole: 196 − 100 = 96 µm² — the chrome that actually changed, and 1 µm² = 10⁶ nm², so 96 µm² = 9.6 × 10⁷ nm². ✓+elem/−elem—+2 added, −3 removed. Elements are matched on their geometry, so an edited element reads as one removed plus one added: the moved pad (+1, −1) and the grown fiducial (+1, −1), plus the deleted pad (−1). Per row that lands as1/0: +1 −2(the moved pad's pair plus the deletion) and2/0: +1 −1(the fiducial's pair) — the same five events, split by layer. These columns catch changes the area columns cannot — a renamed text label or a path-width edit has no XOR area at all.
On Chrome and Edge, Glyph follows this modal with a save dialog offering
chip-rev-a.diff.txt, so the report can live next to the files.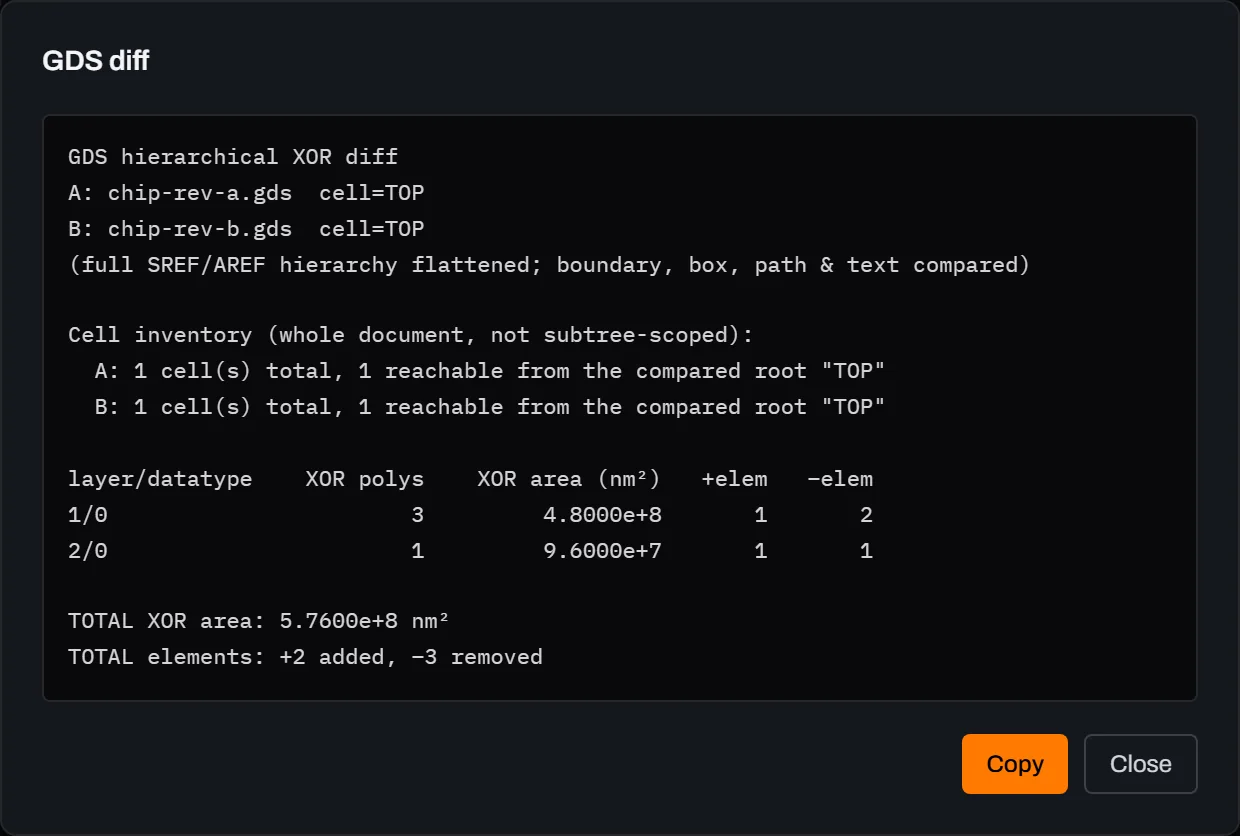 View full image
Close the report — the differences are still there. This is the part that makes a diff usable rather than a wall of numbers you close and lose: the four regions are now live markers on the canvas, each with a crosshair, a bounding box and a label like
1. Diff 1/0 — 20 µm × 20 µm. The Results tab has picked up a badge reading4. Note that only two labels are drawn: labels whose text would overprint another are withheld, so the two 2 µm slivers show crosshairs without captions until you zoom in. Glyph keeps the largest 500 regions of any diff; if it dropped any, the report says so explicitly rather than quietly showing you a subset.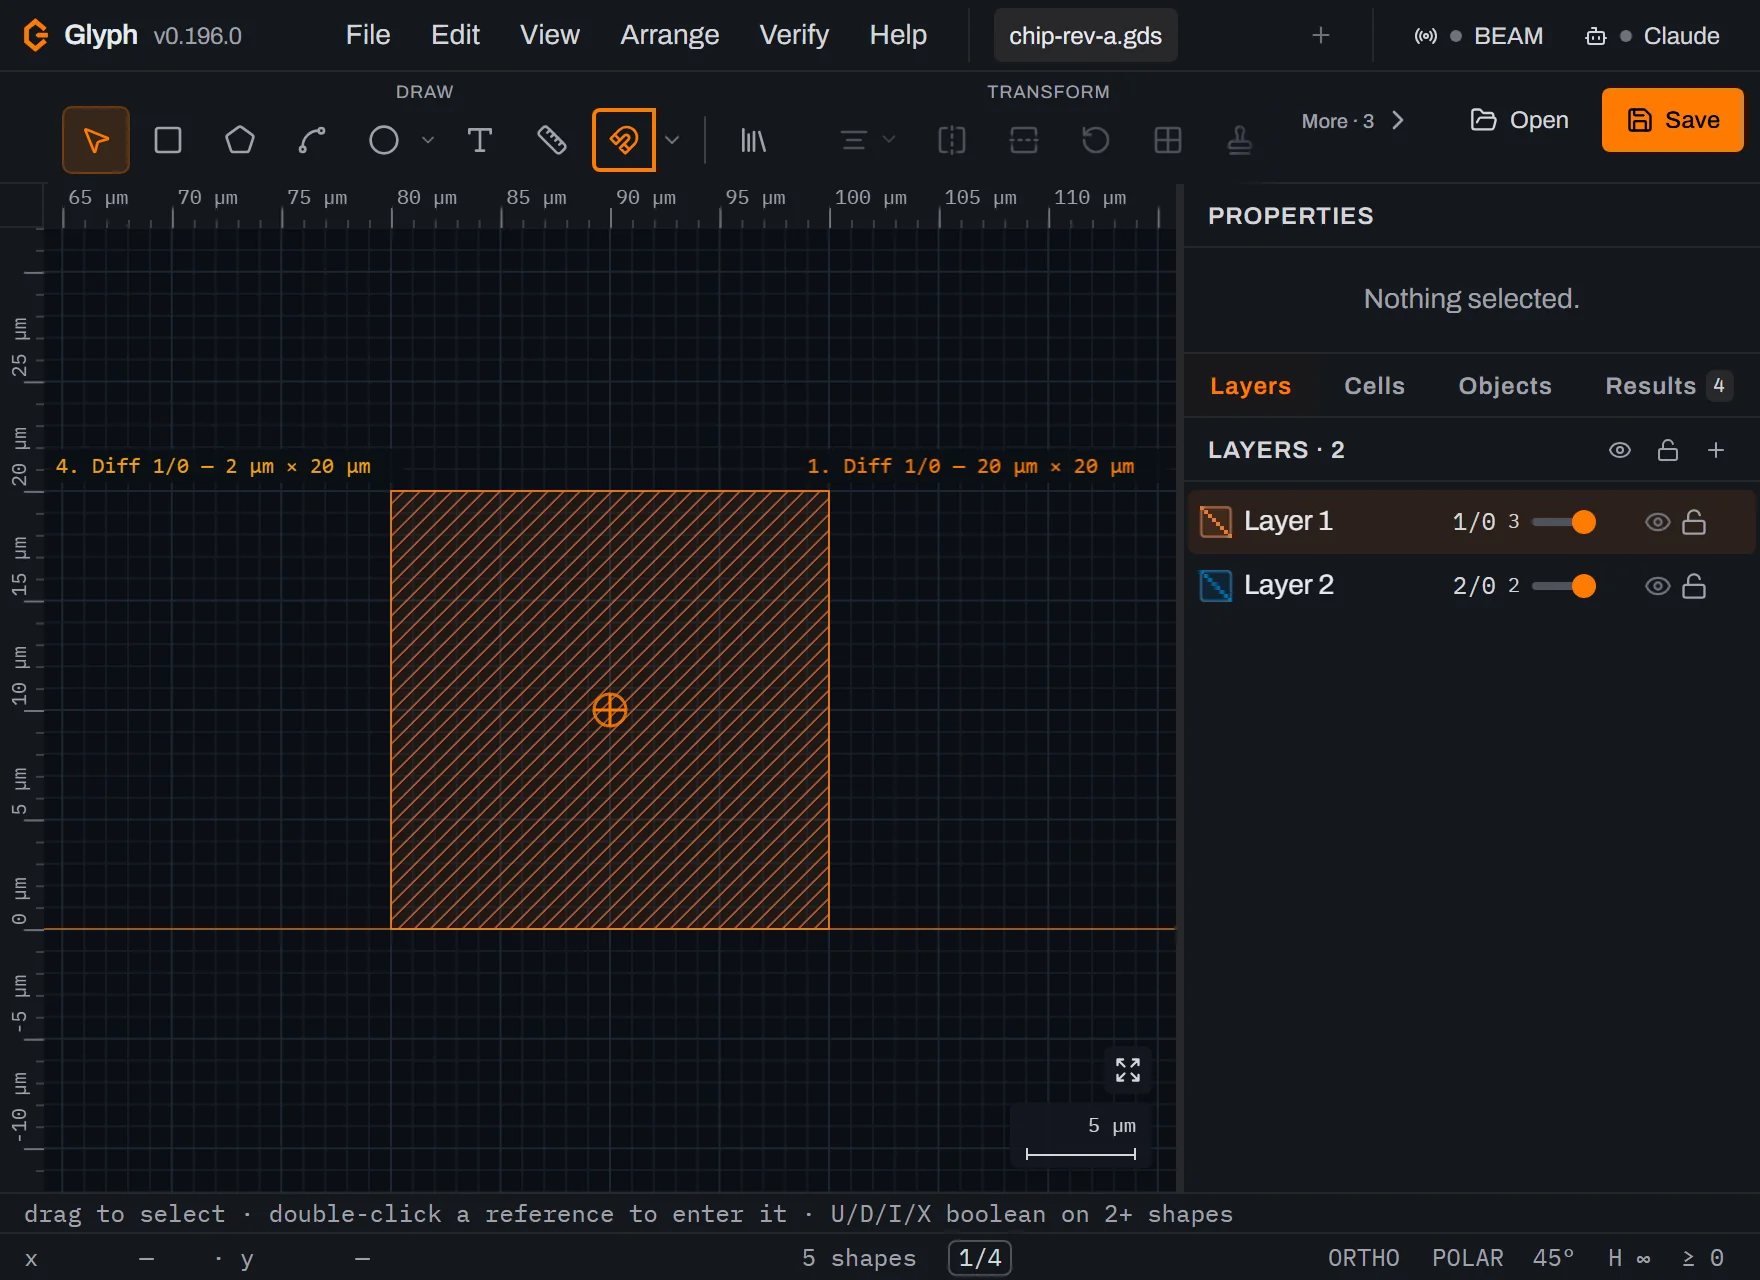 View full image
Open the Results tab. The four findings are grouped under the rule that produced them —
diff, at severity Info — and the header reads4 active · 0 waived · 4 total. That grouping is the provenance: design-rule violations, an imported KLayout.lyrdband CSV review markers all land in this same list, so the rule name is how you tell them apart. The regions are ordered largest first, which is why the deleted pad is1.and the two 2 µm slivers are last:1. Diff 1/0 — 20 µm × 20 µm — 20 × 20 µm at (90, 10) µm 2. Diff 2/0 — 14 µm × 14 µm — 14 × 14 µm at (95, 45) µm 3. Diff 1/0 — 2 µm × 20 µm — 2 × 20 µm at (41, 10) µm 4. Diff 1/0 — 2 µm × 20 µm — 2 × 20 µm at (61, 10) µm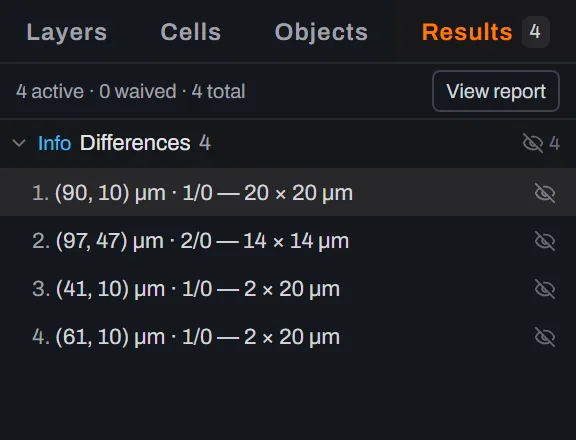
Step with F2. Press F2 to move to the next region — here
2. Diff 2/0 — 14 µm × 14 µm, the fiducial ring. The canvas re-frames on it (a ~400 µm-wide view, again ten times the region's narrow dimension of context) and the Results row highlights, because the stepper's cursor and the panel's selection are the same thing; clicking a row does exactly what F2 does. If you have remapped F2 (the KLayout preset gives it to zoom-fit), the toast in step 12 names whichever key is actually bound instead.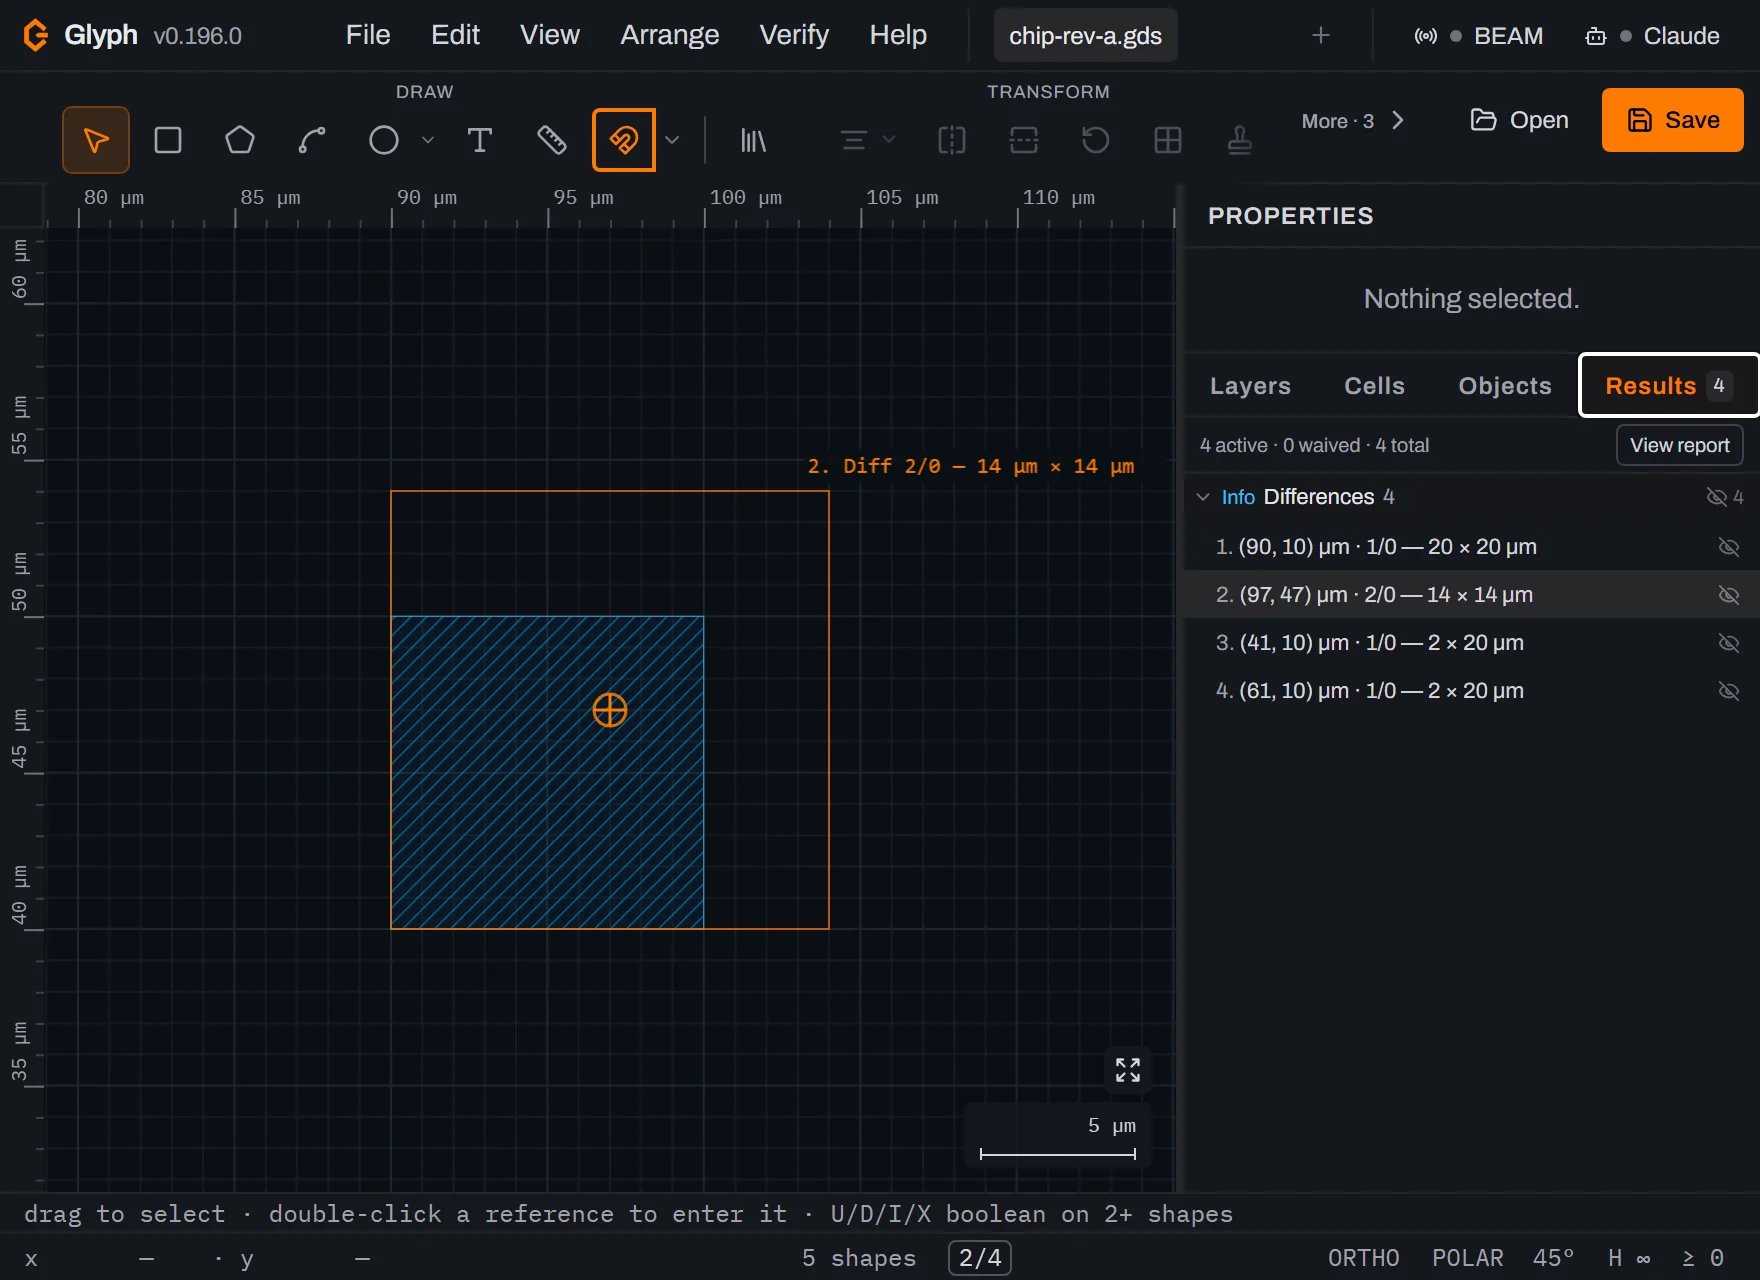 View full image
Press F2 again — and watch the zoom. Region
3.is a 2 µm × 20 µm sliver, and Glyph frames it in a ~55 µm-wide window rather than the ~400 µm one it used for the fiducial. The zoom keys on the region's narrow dimension, so a thin sliver gets real magnification while a long thin one does not drag the view backwards. Regions 3 and 4 are the two edges of the same pad: it left the strip at x = 40–42 µm and arrived over 60–62 µm, and a shifted rectangle XORs into exactly that pair.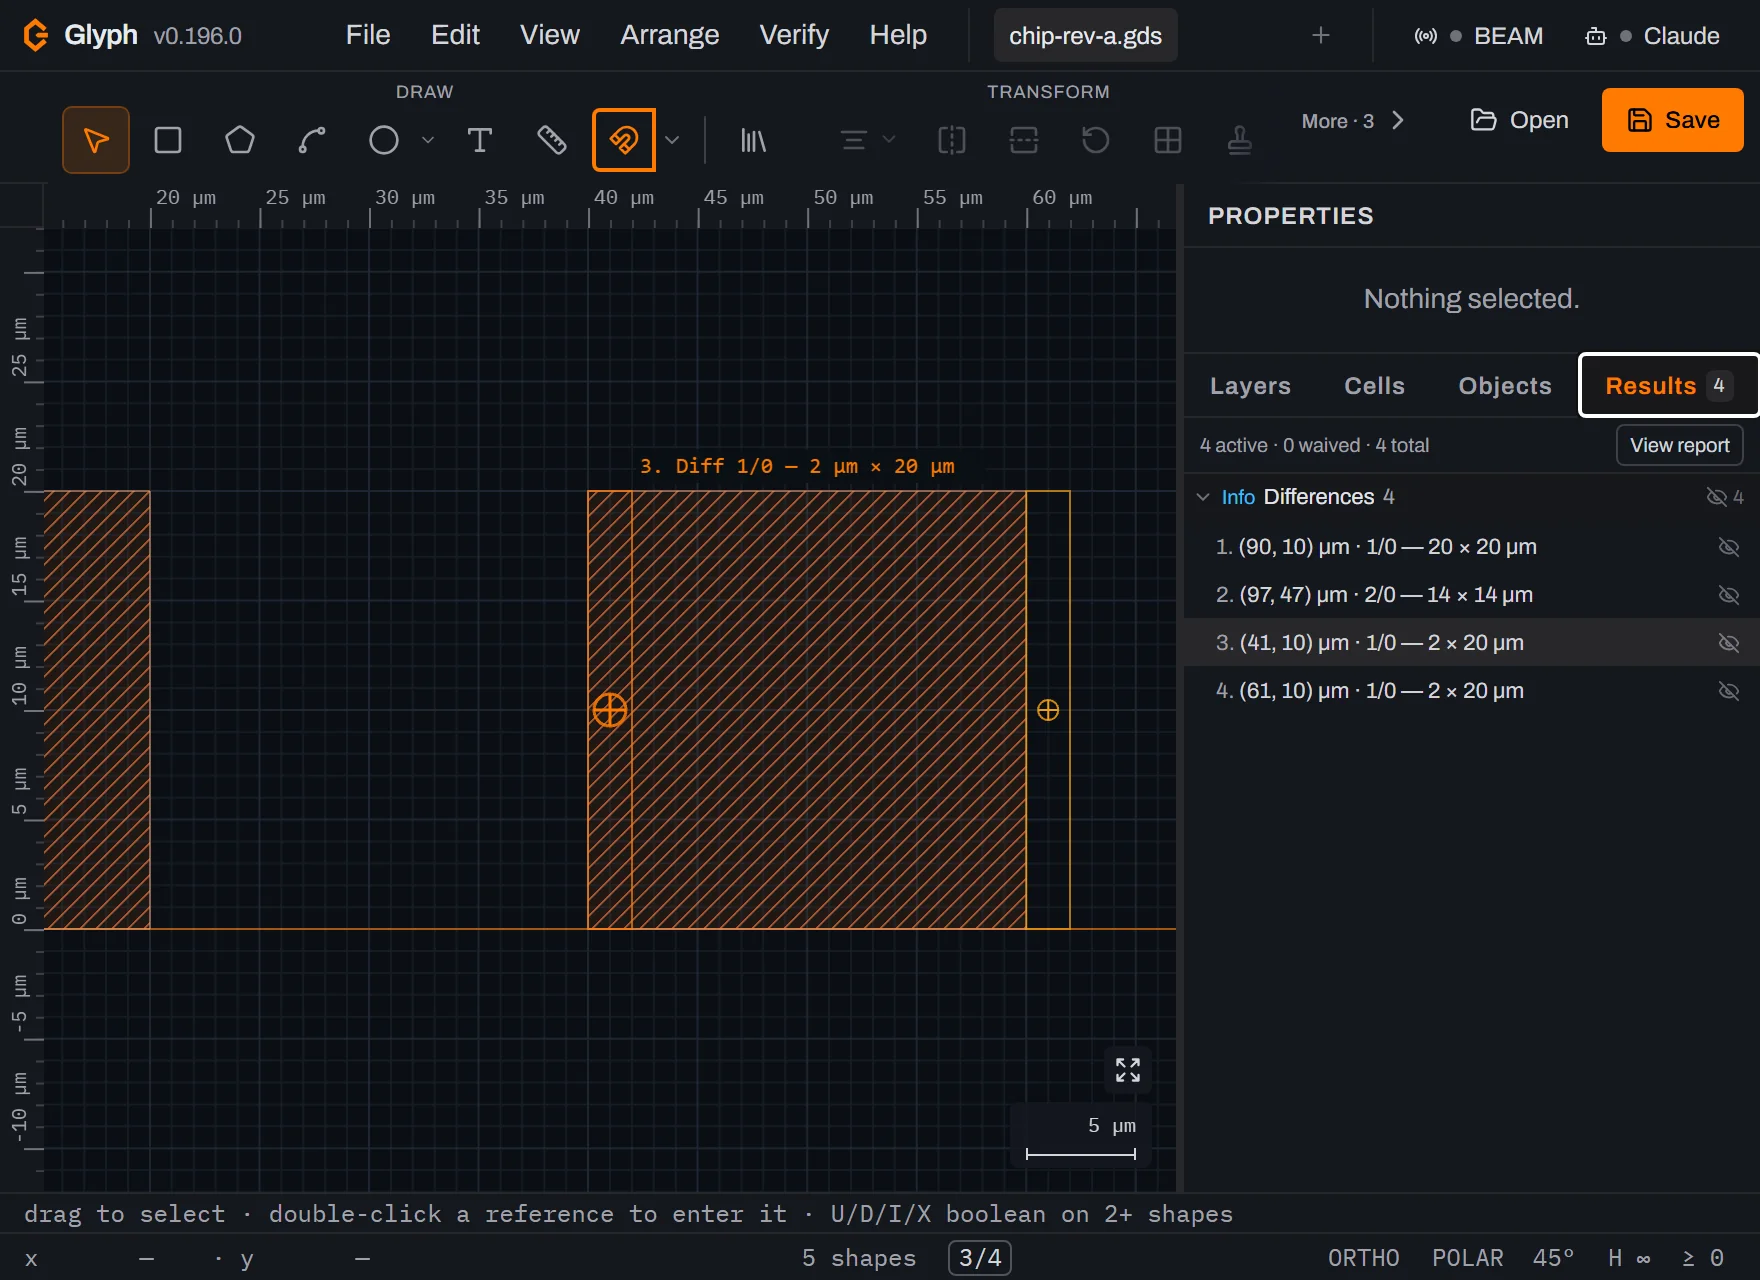 View full image
Shift+F2 steps back. The same key with Shift walks the list in reverse — back to region
2.here. Nothing is consumed by stepping; the list is a loop, so F2 from the last region returns to the first.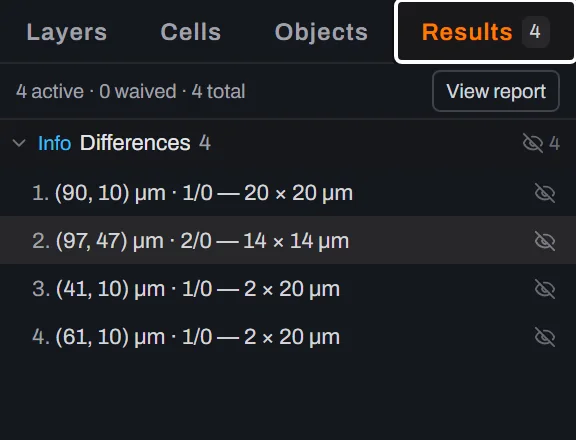
Hover the row you want to dismiss. Say the 2 µm shift is the change you asked for. Point at row
3. Diff 1/0 — 2 µm × 20 µm — 2 × 20 µm at (41, 10) µm— an eye-with-a-slash button fades in at the right-hand end of that row (Waive this finding). It is invisible until you hover, which is why it is easy to miss; the group header carries the same button, and waives everything in the group.
Click it. The row goes struck-through and grey, the header becomes
3 active · 1 waived · 4 total, the group count readsdiff 3 / 4, the tab badge drops to3, and that marker stops being drawn on the canvas. A Clear waivers button appears in the header to undo the lot; the button on the row itself (now a curved arrow) un-waives just that one. Note that row4.— the other half of the very same 2 µm move, at (61, 10) — is a separate finding and stays active. That is deliberate: a diff reports geometry, not intent. Waive its twin too if you consider the move signed off, or use the group header's button to waive all four at once.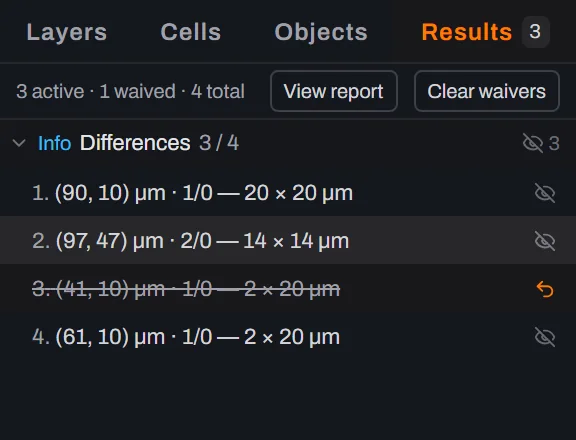
Run the diff again. Repeat steps 11 and 12 with the same file. Because there is already a set of findings in the list — and that list is shared with DRC and imported results — Glyph asks before replacing it:
Replace the 4 markers currently shown with 4 diff regions? The text report stays either way.Declining keeps what you have and still gives you the report.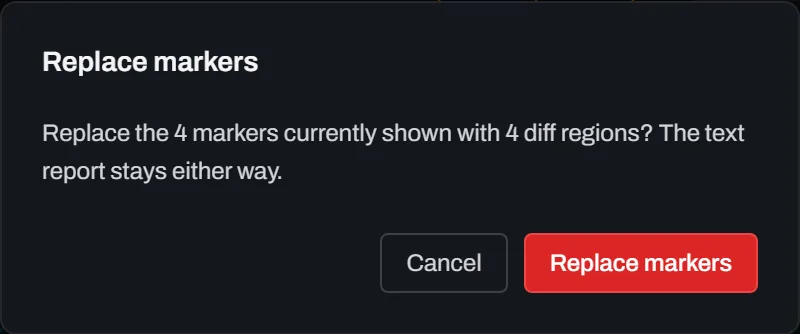 View full image
Confirm — and see the waiver survive. Everything about this shot says "fresh run": a new
2 layers differ — … in 3 regions, showing 1 of 3 active (1 waived); press F2 for the next.toast (the waived region is left out of the count F2 steps through), and the canvas re-framed on region1.again. Yet the sliver you waived is still struck through, the header still reads3 active · 1 waived · 4 total, and only three crosshairs are drawn. A waiver is keyed on the rule plus the rounded bounding box, not on the marker's identity, and it is stored with your other process-scoped preferences rather than in the document — so it survives a re-run, a reload, and re-opening the.gdsfrom disk. That is what turns a diff from a one-off report into a review you can repeat until only the unexpected differences are left.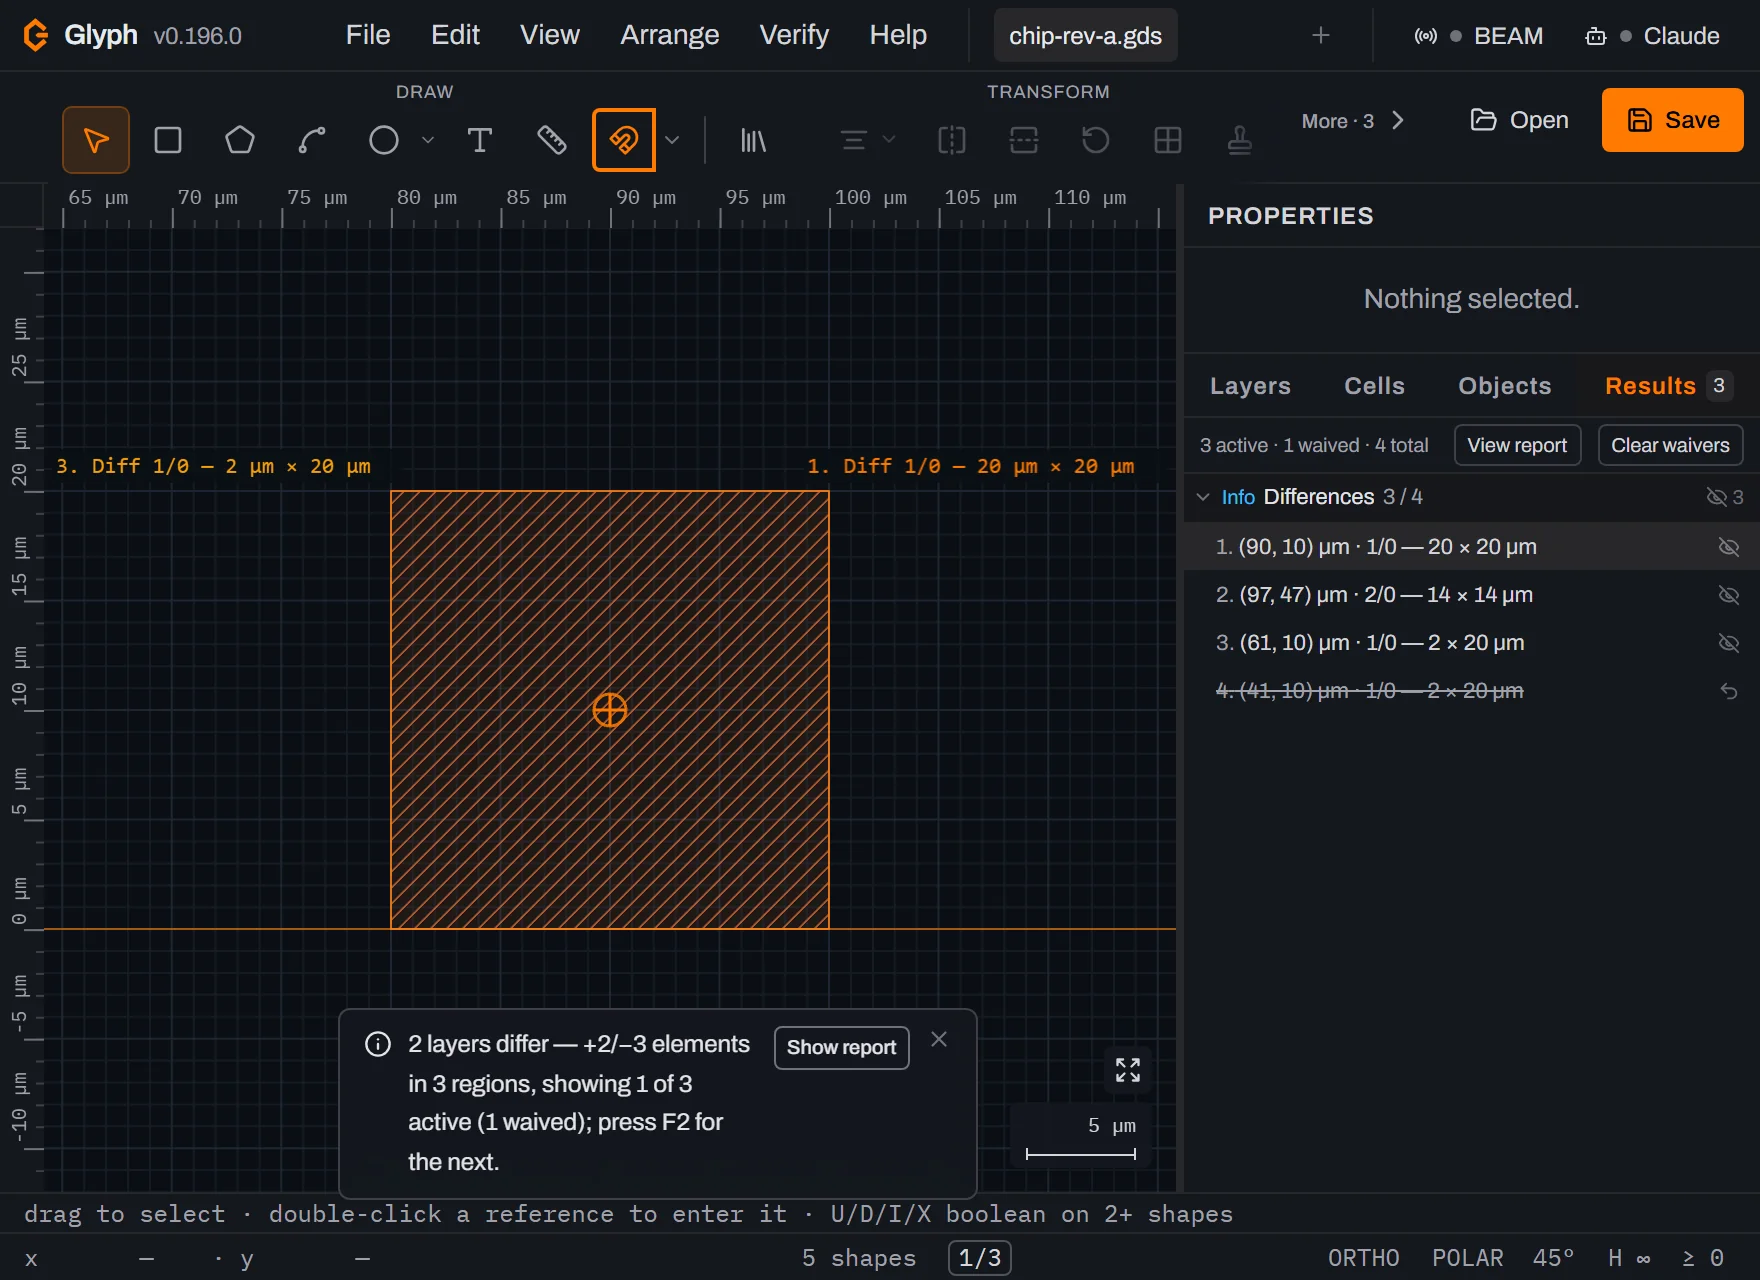 View full image
Grading small differences as noise (tolerance bands)
The dialog opens before the file picker asks for a comma/space-separated, ascending list of tolerance bands, in µm. The field defaults to a single 0 — the exact comparison this whole guide walks through — only the first time you open it in a session; the field is session-sticky, so once you've submitted a value once, the dialog reopens pre-filled with whatever you last typed rather than resetting to 0. Either way, pressing Choose file… without changing the field reproduces whatever comparison that field's current value describes — exact on a fresh session, your own last tolerance list on a later re-diff.
Type one or more real distances instead (e.g. 0, 0.001, 0.005, 0.010) to grade every difference region by the smallest tolerance whose erosion "swallows" it, rather than treating every XOR polygon as equally significant:
- A region swallowed by any listed tolerance reads as noise (severity Info) — except the region swallowed only by the largest tolerance given, the borderline case, which reads Warning.
- A region that survives erosion even at the largest tolerance is a genuine difference — severity Error, labelled "(real difference)" in the Results panel and the text report.
- Nothing is hidden or dropped: every region, however small, is still a live marker and still counted — the report adds a per-band count table (how many regions fell in each tolerance, and how many were real differences) alongside the per-layer numbers from step 13.
Reach for this on a real re-export where you expect small, known-benign differences — sub-100 nm rounding from a different writer, say — and want those graded apart from an actual pad move. Cancelling this dialog aborts the diff outright; there's no "proceed anyway" reading of dismissing a prompt for a comparison that hasn't started yet.
What you built
Two revisions of a small chip, made by hand so you know exactly what changed, and a repeatable review of one against the other. You have the numeric report (per layer, XOR area plus elements added and removed) with every figure reconciled against the three edits, a navigable set of four regions you can walk with one key, and a waiver on a difference you had already agreed to — so running the same comparison tomorrow surfaces three findings, not four.
Two things worth remembering about what the diff does and does not see. It flattens the full hierarchy before comparing, so a change made once inside a cell and used in two hundred instances is reported everywhere it lands, not once. And a difference with no area — a text label edited, an element renamed — produces no region marker, because a zero-size marker cannot be navigated to; those changes show up only in the +elem / −elem columns of the report, which is the one place worth reading even when the region list is empty. If the comparison file is truncated or damaged, Glyph refuses to diff against it rather than reporting the missing geometry as changes.
Next steps
Open and save GDS files covers what Glyph preserves through a round trip — library name, cell order, timestamps — which is the other half of trusting a file you got back. The Results panel and its waivers are shared with Glyph's own checker: see Design-rule check (DRC) for the rules it can run before you commit to a mask, and Cells and hierarchy for what "flattening the hierarchy" means in a GDSII file. Every key used above, including how to remap F2, is listed in Keyboard shortcuts. Then open the editor and diff the two files you have been meaning to reconcile.