Quickstart — your first mask
New to layout tools entirely? This is the fastest way to end up with a real .gds file you can reopen in Glyph — or in KLayout, or any other GDSII tool. Every step below uses machinery you'll reach for constantly, so nothing here is throwaway.
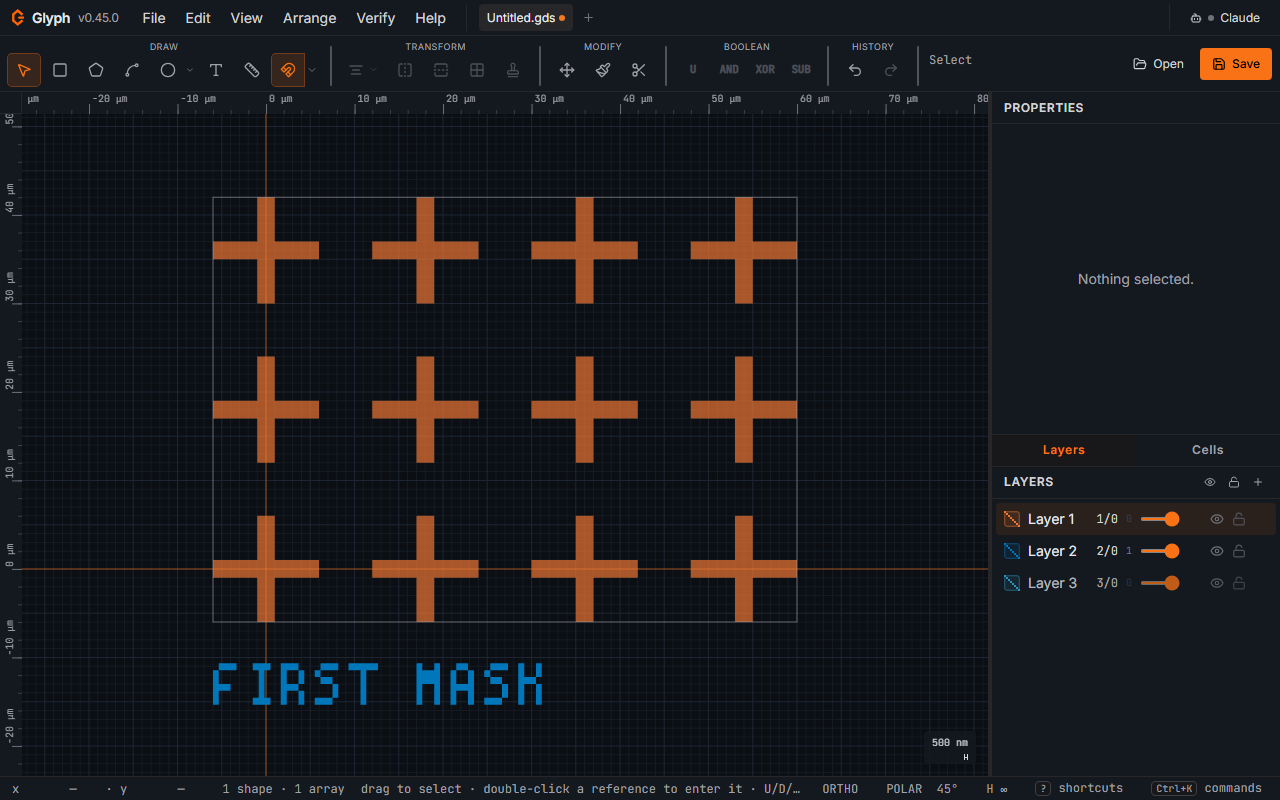 View full image
Three things that make Glyph less scary than it looks:
- Everything is stored in nanometres, even though you'll normally type and read µm or mm — File → Setup → Settings picks the display unit, and Glyph converts for you under the hood. The numbers on disk are always nm-precise.
- Text and circles aren't "special." They flatten to ordinary polygons on export, so what you see is what a mask shop prints — a
Tlabel or aCcircle is exactly as real as a hand-drawn boundary. (This is a common first fear coming from other tools — Glyph's text is never a font reference that silently vanishes.) - An instance (SREF/AREF) is a live reference, not a copy. Placing the same cell twice and editing the cell once updates every placement — that's how step 6 below works, and it's the single most useful idea in GDS layout.
- Draw a box. Press
Bfor the Box tool, then click and drag on the canvas. You now have a filled rectangle on whichever layer is active (the highlighted row in the Layers panel). - Size it precisely. With the box still selected, look at the Properties panel on the right. Type an exact width and height into the W / H fields and press
Enter— a typed value always wins over whatever you dragged. This is the panel you'll use for almost every precise edit in Glyph, not just this one. On a window narrower than 580 px (a phone) the right-hand panels — Properties here, and the Layers and Cells tabs in steps 3 and 6 — are not on screen until you open them with the toolbar's Panels button (the panel icon at the right end of the toolbar). - Add a layer and give it a colour. Click the + at the top of the Layers panel to add a new layer. It becomes the active layer straight away (its row is highlighted), so everything you draw next lands there; click any other row to switch back. Then click the new row's colour chip: a fill pattern applies as soon as you click it, and a colour applies when you click Apply to fill (or Apply to edge). While a picked colour is not applied yet, the dialog says so, both Apply buttons show it, and Close reads Discard. A "layer" in Glyph is just a numbered GDS layer with a colour you assign for your own sanity; the number is what actually matters to a mask shop.
- Place an alignment cross from the component library. Open , choose Standard cells from the dropdown, click the Alignment cross card, then click the canvas to drop it and press
Esc(the card stays armed, so every click drops another cross until you do). This isn't hand-drawn geometry — it's a small cell with a single instance (SREF) placed at that point. - Add a text label. Press
T, click where you want the label, then type your text into the Add text label dialog and click Add (edit it later in the Properties panel). It renders in Glyph's built-in stroke font by default and — per the reassurance above — exports as real polygons. - Array it. Open the Cells tab (beside Layers), find the alignment-cross cell you just placed (its name is
PC_STD_CROSS_1; a narrow panel shortens it to…CROSS_1), and hover its row to reveal its Insert Array icon; click it. Set rows/cols and a step size, click Place, then click the canvas to place the grid. Every mark in that grid is the same instance repeated (an AREF, not nine separate crosses) — edit the original cell later and the whole array updates together. - Measure the gap. Press
Mand drag between two features to read the distance live in the status bar and on the canvas. PressEnterright after the drag to pin it as a permanent labelled dimension instead of letting it disappear when you switch tools. - Save it. Press
Ctrl+S. The first save opens a file picker; after that,Ctrl+Swrites straight back to the same file. (A browser with no save picker — Safari, Firefox — downloads the.gdsinstead, and each later save downloads a fresh copy.) You now have a real.gds— open it again in Glyph, or hand it to any other GDSII tool.
That's the whole loop: draw, size, layer, instance, array, measure, save. Everything from here on is reference material for the same handful of ideas, described in more depth. Layers goes deeper on layers, Cells and hierarchy–7 on cells and instances, Fonts on text and fonts, Measuring on measuring, and File I/O on saving and export formats.